I learnt this Karnataka style Puliyogare recipe from my School moms group friend Lakki. Recently we went to Sattvam restaurant, JP nagar for our kitty party. In their lunch buffet, I tasted Puliyogare and it was so good. Lakki told me that she can make a better version than the restaurant ones which would be more like temple style. I was so tempted by this and got the recipe from her.
Usually many people here make Instant Puliyogare with MTR puliyogare paste or powder. But my friend shared the recipe of making homemade Puliyogare gojju along with powder. So no need of store bought puliogare paste or powder for this recipe.
For Aadi 18 and Purattasi sani thaligai, I make 5 rice varieties. This time I tried Karnataka style puliyogare instead of my Tamil nadu style puli sadam/Tamarind rice. It came out so good. As my friend told, it was more like temple style puliyogare we get here. I was so happy with the result. This fool proof recipe has to be documented in my blog.
So here you go, the most popular Karnataka style Puliogare recipe with step by step pictures. Soon I will try to update it with video.
Karnataka Style Puliyogare recipe
Karnataka style puliogare recipe from scratch with homemade Gojju and Puliyogare powder.
Soak tamarind in 1 cup of water and take the extract. Set aside
Heat 1 tsp oil in a kadai and roast all the ingredients given under “to roast and grind” to a coarse rava like powder. Set aside.
Heat cooking oil in a kadai and temper mustard, urad dal, chana dal, roasted peanuts, curry leaves and hing.
Add the tamarind extract adding salt and turmeric powder. Boil till thick.
When it starts to become thick leaving oil, add jaggery and roasted powder.
Boil for few minutes till it becomes a thick paste. Puliyogare gojju is ready. Switch off the flame.
Lastly add the roasted sesame seeds powder and shredded dry coconut. Mix well.
Serve with papad or fryums. Enjoy !
METHOD - STEP BY STEP PICTURES
Soak tamarind in 1 cup of water and take the extract. Set aside.
Heat 1 tsp oil in a kadai and roast all the ingredients given under “to roast and grind” to a coarse rava like powder. Set aside.
Heat oil in a kadai. Splutter mustard seeds, urad dal, chana dal, roasted peanuts, hing and curry leaves.
Add the tamarind extract in a vessel adding salt, turmeric powder. Boil till thick.
When it starts to become thick, add jaggery and roasted powder. Boil for few minutes till it becomes a thick paste leaving oil in sides. Puliyogare gojju is ready. Switch off the flame.
Take boiled and cooled rice in a plate. Add the puliyogare gojju, roasted sesame seeds powder and shredded dry coconut. Mix well with a ladle and check for taste. Add more gojju if needed.
Enjoy with papad. As we have added coconut, use this Puliyogare within a day. Do not use your hands for mixing if you are packing for lunch box.
Note
Adjust the quantity of chilli as per your taste.
Color of this puliyogare changes if you don’t use Byadgi chilli.
Try this yummy, Karnataka style Puliyogare recipe. You will love it !
Dhania thogayal / kothamallai vidhai thogayal was in my try list for years. Recently one of my readers was also asking me to try and share this recipe in my blog. Actually Coriander seeds chutney can be prepared in many ways. The recipe I shared here is ideal to mix with plain rice topped with ghee. It doesn’t go well with idli, dosa. Soon I will try to share Kothamalli Vithai chutney for idli, dosa.
In Tirunelveli we make inji pachadi for sodhi kuzhambu. This recipe is very similar to it except the quantity of ginger and coriander seeds. Friends, do try this dhania chutney for a change. Hope you will like it.
Lets see how to make Vithai kothamalli chutney for rice with step by step pictures.
Dhania thuvaiyal | Coriander seeds chutney
Dhania thuvaiyal | Coriander seeds chutney for rice
Heat oil in a kadai. Add urad dal, dhania, ginger, garlic, curry leaves, red chilli. Roast well.
Lastly add the grated coconut. Mix for few minutes and switch off the flame.
Take everything in a mixie jar. Add salt, tamarind, jaggery and grind everything to a coarse powder without adding water. Add little water and grind to thick paste.
Temper the chutney with mustard seeds, urad dal and curry leaves. Add to chutney.
Serve with rice adding ghee.
METHOD - STEP BY STEP PICTURES
Wash and peel the ginger. Chop it finely. Heat oil in a kadai. Add urad dal, coriander seeds, ginger, garlic, curry leaves, red chilli. Roast well in low to medium flame.
Lastly add the grated coconut. Roast for few minutes and switch off the flame. Cool down.
Take everything in a mixie jar. Add salt, tamarind, jaggery and grind to coarse powder first. Then add required water and grind to a thick , smooth paste. Transfer to a bowl.
Heat oil in a small kadai. Temper mustard seeds, urad dal, curry leaves and add to chutney. Mix well and serve with plain rice topped with ghee. ( I skipped this part)
Note
This chutney goes well with rice, not with idli dosa.
Adjust the quantity of red chilli as per your taste.
I have roasted all the ingredients in oil together. You can also dry roast the coriander seeds firstly. Remove in a plate. Then heat oil and roast the other ingredients.
Chettinad vazhakkai varuval recipe was in my try list for long time. Its a very simple recipe but tastes ultimate. Kids would love it for sure. I have already posted Chettinad Vazhakkai masala curry recipe. But this one is completely different from that version.
Friends, do try this easy and yummy Chettinad style Vazhakkai varuval recipe. You will love it for sure. Its a best side dish for sambar, rasam and curd rice.
Garam masala powder OR chicken masala powder – 1/2 tsp
Salt - as needed
Curry leaves - to garnish
To grind
Garlic cloves - 10
Fennel seeds - 1 tsp
Curry leaves - fistful
HOW TO MAKE CHETTINAD VAZHAKKAI VARUVAL
Wash and peel the skin of raw banana. Chop into small finger size pieces.
Keep in water till use to avoid discoloration.
Grind fennel seeds, curry leaves, garlic to a coarse paste and set aside.
Heat oil in a kadai. Add the raw banana pieces in batches and shallow fry till light golden in color. Remove in a plate.
In the remaining oil, splutter cumin seeds. Add ground paste, red chilli powder, turmeric powder, dhania powder and garam masala powder.
Mix well in low flame and then add the roasted raw banana pieces.
Mix gently to coat the masala. Let it cook in low flame for few minutes.
Switch off the flame and garnish with curry leaves. You can sprinkle lemon juice if you like.
Serve with sambar, rasam and curd rice. Enjoy !
METHOD - STEP BY STEP PICTURES
Wash and peel the skin of Raw banana. Chop into finger size pieces. Immerse in water till use to avoid discoloration.
Heat oil in a kadai. Add the raw banana pieces in batches and shallow fry in oil till it becomes light golden in color and becomes soft. Remove in a plate.
Grind fennel seeds, curry leaves and garlic to a coarse paste without adding water. Set aside.
In the remaining banana fried oil, splutter cumin seeds. Lower the flame completely. Add the ground paste, turmeric powder, red chilli powder, dhania powder, salt and garam masala powder / Chicken masala powder.
Mix quickly and add the roasted banana pieces. Mix gently to coat the masala. Cook in low flame for a minute and switch off the flame. Garnish with curry leaves. Add lemon juice if you like. Enjoy !
Note
Adjust the quantity of spice powders as per your taste.
You can replace red chilli powder + dhania powder with sambar powder but flavor may vary slightly.
You can use either garam masala powder or chicken masala powder. I prefer chicken masala powder for best flavor and taste.
Try this easy and yummy Raw banana roast in Chettinad style and enjoy !
I love to try varieties of peanut chutney recipes as side dish for idli and dosa. This time keeping tomato prices in my mind, I was looking for some peanut chutney without tomato. Surprisingly I got this peanut chutney recipe without tomato, onion and coconut as well. I was so happy and tried it immediately. It came out so good. We all enjoyed it with hot idli.
Usually I make peanut chutney in watery consistency. So I prepared this chutney in thin consistency. You can make it thick or thin as you wish. Whatever be the consistency, taste would be great. Friends, do try this peanut chutney recipe for idli, dosa. You will love it for sure.
Peanut chutney without tomato, onion and coconut
Peanut chutney recipe without coconut, tomato and onion for idli, dosa
HOW TO MAKE PEANUT CHUTNEY WITHOUT COCONUT, TOMATO, ONION
Dry roast peanuts for 2 minutes in microwave high power or roast in a kadai till skin splits.
Heat oil in a kadai. Add urad dal, red chilli, cumin seeds, garlic, curry leaves and roasted peanuts.
Roast till urad dal turns golden in color. Remove and cool them.
Grind to a smooth paste adding required water.
Temper with mustard seeds, urad dal, curry leaves and add to chutney.
Mix well and serve with idli, dosa.
METHOD - STEP BY STEP PICTURES
Dry roast peanuts in a kadai till the skin splits. You can also roast in a microwave in high power (800W) for 2 minutes. Set aside. I din’t remove the skin of peanuts. You can if you like.
Heat oil in a kadai. Add urad dal, red chilli, garlic, cumin seeds, curry leaves and saute till urad dal turns golden in color. Lastly add roasted peanuts and mix well.
Switch off the flame and add tamarind, salt. After the roasted mixture is cooled down, grind them to a smooth paste adding required water.
Transfer to a bowl. You can add some water if you like watery chutney. Temper the chutney by heating some oil in a small kadai. Splutter mustard seeds, urad dal and curry leaves. Add to chutney and mix well.
Serve with hot idli, dosa. Enjoy !
Note
Adjust the quantity of red chilli as per your taste.
You can also add chana dal along with urad dal for roasting.
You can also add pottukadalai / Roasted gram dal along with urad dal.
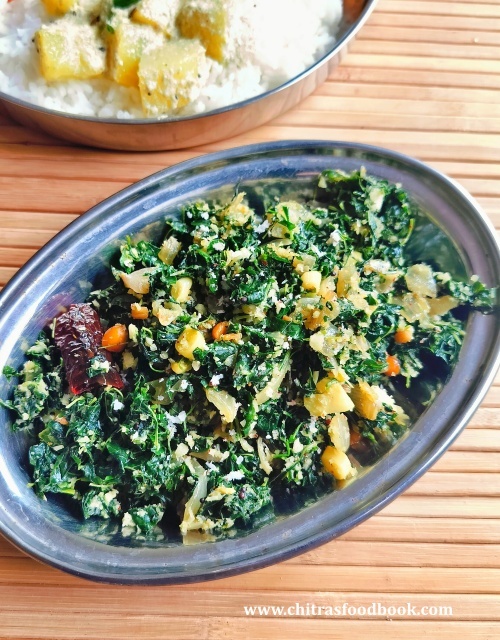
Keerai poriyal is an yummy side dish for sambar and vatha kuzhambu rice. Usually I make keerai kadaiyal with garlic which is our family favourite. Its been a long time I made keerai poriyal or kootu in my kitchen. So I prepared this poriyal recipe with siru keerai (Tropical Amaranthus in English). It came out so well. You can make the same with arai keerai, mulai keerai and murungai keerai too. Procedure for making this poriyal is the same for all the keerai.
Addition of coconut is the highlight of this keerai poriyal. So do not skip it. It gives a nice taste and texture to the poriyal. You can make this for lunch box as well. Its a very good side dish for sambar rice. Kids will also have it. Lets see how to make keerai poriyal with siru keerai.
North Indian style pumpkin curry was in my try list for long time. When I was looking for some good recipes, I came across Kaddu ki sabzi recipes like Bengali style, Maharashtrian style and Gujarati style with some minor changes in each recipe. I made a fusion of all these recipes following an YouTube video. It came out finger licking delicious.
Usually I make our South Indian style Pumpkin curry directly in a pressure cooker but here I didn’t want to take risk as I am trying it for the first time. It came out so well with nice flavour and color. We loved it. Friends, if you are bored of making South Indian Pumpkin recipes, try this North Indian style Kaddu ki Sabji. You will love it and make it more often. Please CLICK HERE TO WATCH VIDEO.
Kaddu ki sabzi recipe
Kaddu ki sabzi recipe | Kaddu ki sabji for rice, roti.
Wash and peel the skin of pumpkin and chop into big cubes. Set aside.
Heat oil in a kadai. Splutter mustard seeds, methi seeds, cumin seeds, red chilli and curry leaves.
Add the chopped pumpkin pieces and saute for a minute. Add turmeric powder, red chilli powder, , coriander powder, garam masala powder, salt and mix well.
Lastly add water and cover cook till pumpkin is cooked well.
Add crushed kasoori methi, jaggery, coriander leaves and mix well. Switch off the flame, add few drops of lemon juice and serve hot with rice and roti.
METHOD - STEP BY STEP PICTURES
Wash and peel the skin of pumpkin and chop into big pieces. Set aside.
Heat oil in a kadai and splutter mustard seeds, methi seeds, cumin seeds, red chilli and curry leaves.
Add the chopped pumpkin pieces and saute for a minute. Add turmeric powder, red chilli powder, coriander powder, garam masala powder, salt and mix well.
Add water and cover cook till pumpkin is cooked well. Add crushed Kasoori methi, coriander leaves, powdered jaggery and switch off the flame.
Serve with rice and roti. Enjoy.
Note
Adjust the quantity of spice powders as per your taste.
Addition of jaggery and Kasoori methi gives a nice flavor. Don’t skip it.
Try this no onion, no garlic Kaddu Ki Sabzi and enjoy with rice and roti.
When it comes to street food in Mumbai, pav bhaji reigns supreme as the most popular and beloved snack. It has been a go-to choice for many, including my daughter, who can't resist its flavoursome charm. Traditionally, I would prepare pav bhaji by cooking the vegetables and masala separately, but recently, I stumbled upon a game-changing technique on YouTube: one pot, one shot pressure cooker pav bhaji. Intrigued by its vibrant colours and tempting texture, I couldn't help but bookmark a few videos to try it out.
During a recent visit to my parents' house, they surprised me with the Prestige Svachh FLIP-ON Pressure Cooker. As a cooking enthusiast, I've always appreciated the convenience and time-saving benefits of pressure cookers. With its gas and induction compatibility, it caters to all kitchen setups. The unique lid design with spillage control caught my attention, making it incredibly easy to handle and maintain. I was particularly impressed by the effortless locking and unlocking mechanism, which even beginners will appreciate.
Excited to put my new cooker to the test, I decided to try making pav bhaji masala using this innovative technique. The results were nothing short of extraordinary! The pressure cooker method allowed me to complete all the tempering, sauteing, and cooking in one go, eliminating the need for multiple pans and saving precious time. The end product was a tantalising plate of pav bhaji that retained its authentic flavours and delightful texture. It was an instant hit with my family, leaving us all craving more.
Tempering, sautéing, cooking are all done in one go without any compromise in taste and texture. In the quest for the perfect pav bhaji, the pressure cooker technique has revolutionised the way we prepare this beloved dish. Thanks to the Prestige pressure cooker and its exceptional features, cooking has become a breeze, with uncompromised taste and texture. So, why wait? It's time to elevate your pav bhaji game and savour the wonders of this delectable dish. Get ready to embark on a culinary journey that will leave you craving for more with each flavourful bite.
Friends, do try this pressure cooker pav bhaji recipe and enjoy with your family. Even bachelors can give this as try. You can make the same in instant pot as well.
Wash and chop onion, tomato and vegetables finely. Set aside.
Heat butter+cooking oil in Prestige pressure cooker.
Splutter cumin seeds. Saute onion till transparent. Add ginger garlic paste and saute well.
Add tomato and saute till mushy. Add all the spice powders , salt and mix well.
Lastly add the chopped vegetables and mix well. Add required water and pressure cook in low flame for one whistle.
Open the cooker after the steam is released. Take a potato masher and mash it well to make a paste like consistency.
Add little water if its too thick. Boil for a minute and switch off the flame.
In a tadka pan, melt butter and add pav bhaji masala powder and Kasoori methi. Switch off the flame and add to pav bhaji masala.
Garnish with coriander leaves. Pav bhaji masala is ready.
For pav buns, take the bun and slit it. Heat butter in a dosa tawa and add the pav bhaji masala powder, a pinch of salt and coriander leaves. Mix well.
Dip the pav buns in this masala and cook both the sides till soft. Remove and serve it.
Serve the pav buns with pav bhaji masala, finely chopped onions and lemon wedges. Enjoy.
PRESSURE COOKER PAV BHAJI RECIPE - STEP BY STEP PICTURES
Wash and chop onion, tomato, vegetables and set aside. Heat butter+cooking oil in a pressure cooker base.
Splutter cumin seeds. Saute onion till transparent and add ginger garlic paste and saute till raw smell goes off. Add chopped tomato and saute till mushy.
Add turmeric powder, red chilli powder, pav bhaji masala powder and salt. Mix well and add the vegetables.
Add required water and pressure cook in low flame for one or two whistles. Open the cooker after the steam is released and mash the cooked vegetables and masala using a potato masher.
After mashing, it looks creamy and thick. Add little more water and boil for a minute. Switch off the flame. Lets do the tadka. Heat butter in a kadai and reduce the flame to low. Add pav bhaji masala powder and crushed Kasoori methi. Add to pav bhaji and mix well. Garnish with coriander leaves and set aside.
To cook pav buns : Melt butter in a dosa tawa and add little pav bhaji masala powder and chopped coriander leaves. Slit the bun like an open book, place over it and spread well. Remove the bun and serve hot with bhaji, finely chopped onion and a lemon wedge.
Enjoy !
Note
For variations, you can skip other vegetables and use potato alone.
Use butter generously for best taste.
Try this easy, one pot one shot, pressure cooker pav bhaji and enjoy !