Search Chitra's Food Book

Showing posts with label ANDHRA RECIPES. Show all posts

November 8, 2018

Andhra Hotel Style Peanut Chutney Recipe(Without Coconut) For Idli, Dosa


I got this Andhra hotel style peanut chutney recipe from Vahchef’s video. Vahchef mentioned that he learnt this chutney recipe from the cook of a popular street side hotel. As this recipe is completely different from the usual hotel style peanut chutney without coconut, I tried it immediately. It came out so well. We all loved it very much. If you have roasted peanuts in hand, you can make this chutney under 10 minutes with very less ingredients. The best part is adding roasted and crushed urad dal at the end which is unique and gives a mild crunchy taste. Friends, do try this Andhra hotel style peanut chutney without coconut (palli chutney / Verusenaga pachadi in Telugu) for idli, dosa. You will love it.  I served it with thatte idli  ( plate idli).

Hotel peanut chutney recipe without coconut


Hotel peanut chutney recipe without coconut

Andhra hotel style peanut chutney recipe without using coconut. Its a good side dish for idli and dosa.


Cuisine: Andhra
Category: Chutney
Serves: Serves 4
Prep time: 5 Minutes
Cook time: 20 Minutes
Total time: 25 Minutes


INGREDIENTS
1 cup - 250ml
  • Roasted peanuts - 1/2 cup
  • Garlic cloves - 4 small
  • Kashmiri red chilli powder - 1/2 tbsp (1.5 to 2 tsp)
  • Tamarind - small gooseberrey size
  • Salt & water - as needed
  • Cooking oil - 1 tbsp
To saute and grind
  • Cooking oil - 2 tsp
  • Mustard seeds – 1/2 tsp
  • Cumin seeds – 1/2 tsp
  • Urad dal – 1.5 tbsp
  • Curry leaves - 5
  • Hing / Asafetida – 2 pinches
To Temper
  • Cooking oil - 1 tsp
  • Mustard seeds - 1/2 tsp
  • Curry leaves - Few
HOW TO MAKE HOTEL PEANUT CHUTNEY
  1. To make hotel peanut chutney, heat oil in a kadai and roast the garlic.
  2. To this add roasted peanuts with skin. Lower the flame and add chilli powder, tamarind extract. Mix well and switch off the flame.
  3. Add salt and grind to a smooth paste adding required water. Chutney should be slightly watery.
  4. Transfer to a bowl. Again heat oil in a kadai. Splutter mustard seeds, cumin, urad dal, curry leaves and hing. Roast and grind to coarse powder.
  5. Add this powder to peanut chutney. Mix well. Temper mustard, curry leaves.  Add to chutney. Mix well and serve with hot idli, dosa.
PEANUT CHUTNEY - STEP BY STEP PICTURES
  • Dry roast the peanuts in a hot kadai till it skin crackles OR microwave peanuts in high power for 2 minutes. No need to remove the skin. Cool down and set aside. Soak tamarind in 1/2 cup water and take the extract. Keep it aside.

  • In a kadai, heat 1 tbsp oil and roast the garlic cloves. Add roasted peanuts, mix well. Lower the flame. Add salt, red chilli powder. Mix quickly and add tamarind extract without burning chilli powder.

  • After it cools down, grind everything to a smooth paste. Do not add more water while grinding, it may splash. So first grind the peanuts with required water to a smooth paste. Then add more water and grind to a watery chutney.

  • Transfer to a serving bowl. Now heat oil in a kadai and temper mustard seeds, cumin seeds, urad dal, hing and curry leaves. Roast the dal till golden. Grind to a powder.

  • Add to chutney, mix well. Again temper mustard seeds, curry leaves and add to chutney. Tempering is not mentioned in original recipe. But I did it. Please check the main pictures for this step. 

  • Serve this chutney with hot idli and dosa. Enjoy !

Note

  • Adjust the quantity of red chilli powder based on your taste.
  • For variations, you can add 1 tbsp coconut while grinding.

Try this Andhra hotel style peanut chutney for idli, dosa and enjoy !

Continue Reading...


October 15, 2018

Chalimidi, Vadapappu, Panakam - Andhra Naivedyam Recipes

 
Vadapappu, Chalimidi and Panakam are the 3 most popular and quick and easy naivedyam recipes of Andhra. It is usually prepared for Ramanavami , Varalakshmi vratham and on the first day of Navratri. 

All these 3 prasdams can be prepared under 10 minutes. Chalimidi is of two types. One is pachi chalimidi is an uncooked version which is made of rice flour and powdered jaggery. Second one is Pakkam chalimidi in which rice flour is cooked in jaggery syrup. In Tamil, it is called as Maavilakku. Today I have shared Pachi chalimidi recipe. 

Traditionally chalimidi is prepared using homemade processed rice flour. But today I have shared a quick version using store bought rice flour/Idiyappam flour. Vadapappu is also an easy, one ingredient naivedayam recipe prepared by soaking moong dal. It is similar to Karnataka's Kosambari.  Panakam is a sweet drink and a summer coolant that is prepared by mixing jaggery, dry ginger powder, pepper powder in water. 

Friends, do try these 3 easy, yummy Andhra special naivedayam recipes for festivals and offer to God.

Check out my other Andhra recipes too !


Chalimidi recipe, Vadapappu and Panakam


Chalimidi recipe, Vadappau and Panakam

Chalimidi recipe, Vadapappu and Panakam - 3 Andhra special Naivedaym recipes


Cuisine: Andhra
Category: Sweet
Serves: 2
Prep time: 5 Minutes
Cook time: 5 Minutes
Total time: 10 Minutes


INGREDIENTS

1 cup = 250ml
Chalimidi recipe
  • Idiyappam flour / Homemade processed rice flour – 1/2 cup
  • Powdered jaggery or powdered sugar – 1/4 cup ( I used organic brown sugar, so color is dark)
  • Cardamom powder - 1/8 tsp
  • Ghee - 1 tbsp
  • Water - 1 tbsp or more as needed
Vadapappu recipe
  • Moong dal - 1/4 cup
  • Water - to soak
Panakam Recipe
  • Water - 1 cup
  • Powdered jaggery - 2 tbsp
  • Dry ginger powder - 1/4 tsp
  • Pepper powder - 1/4 tsp
  • Edible camphor - a dash
  • Cardamom powder - 1/8 tsp
  • Lemon juice - few drops
  • Tulsi leaves - to garnish

HOW TO MAKE CHALIMID, VADAPAPPU, PANAKAM - METHOD

  1. To make Chalimidi, take the rice flour, jaggery, ghee, cardamom powder in a bowl.
  2. Mix  well. Add little water if needed and make a non-sticky ball. Pachi Chalimidi is ready.
  3. To make vadapappu, wash and soak moong dal in water for 1 hour. Drain the water completely and offer to God. 
  4. For panakam preparation, mix jaggery and other ingredients in water. Filter the water.
  5. Panakam is ready. Garnish with few tulsi leaves and offer to God on Ramanavami and other festivals.

METHOD - STEP BY STEP PICTURES


  • How to make pachi chalimidi : Take store bought idiyappam/ appam flour in a bowl. Add powdered jaggery ( I used organic brown sugar/Naatu sakkarai, so its color is too dark), cardamom powder, ghee. Mix well. Add 1 to 2 tbsp. water. Mix well and make a smooth ball. Pachi chalimidi is ready. 

  • How to make vadapappu : In a bowl, take the moong dal. Wash and soak in enough water for an hour. Drain the water completely and take the soaked, wet moong dal. Offer to God.

  • How to make panakam: Take one cup of water. Add powdered jaggery, cardamom powder, dry ginger powder and pepper powder. Add lemon juice and edible camphor. Mix well and strain it. Garnish with few Tulsi leaves. Panakam is ready to serve. Enjoy !

Note

  • Adjust the quantity of jaggery in chalimidi and panakam based on your taste.

3 easy and yummy Andhra special naivedyam recipes are ready !


Continue Reading...


October 11, 2018

Bellam Paramannam In Pressure Cooker – Andhra Rice Payasam With Jaggery

Bellam paramannam recipe

 Paramannam is a rice based sweet dish that is most popular in Andhra. This Indian dessert recipe is also known as annam payasam, bellam paramannam in Telugu. In simple words, bellam paramannam is nothing but Andhra style rice payasam with jaggery.  It is one of the most important naivedyam recipes that is offered to God for festivals like Sankranti, Varalakshmi Vratham, Ganesh chaturthi, Navratri and much more. This sweet dish is prepared with rice, milk, sugar or jaggery, nuts and ghee.

Authentic paramannam is made by cooking raw rice in milk in an open pot. But I prepared this bellam paramannam in a pressure cooker. It took just 15 minutes for making this Andhra style payasam recipe. Consistency of paramannam depends on the quantity of milk and jaggery syrup. It looks thin when hot and it thickens over time. So you can adjust the quantity of milk as per the desired consistency. There are chances of paramannam getting curdled when you add jaggery syrup to the hot milk. So you should always add the jaggery syrup after switching off the flame. You can make it perfect all the time.

So friends, try this yummy Andhra style paramannam recipe during this Navratri festival and enjoy. Lets see how to make bellam paramannam recipe with step by step pictures.

Check out my other Andhra recipes too !

Paramannam recipe

Paramannam recipe - Bellam paramannam


Paramannam recipe - Bellam paramannam

Andhra style rice kheer with jaggery - Bellam paramannam recipe with step by step pictures.


Cuisine: Andhra recipes
Category: Sweet
Serves: Serves 4
Prep time: 10 Minutes
Cook time: 20 Minutes
Total time: 30 Minutes


INGREDIENTS

1 cup - 250ml
  • Raw rice / Sona masoori rice – 1/4 cup
  • Boiled Milk – 2 cups or Milk + water – 1 cup each
  • Sugar or jaggery – 1/2 cup (adjust as per taste)
  • Water – 1/4 cup for syrup
  • Cardamom – 2 nos (crushed)
  • Cashews and dry grapes/raisins - Few

HOW TO MAKE BELLAM PARAMANNAM RECIPE

  1. In a pressure cooker base, take the rice, milk. Put a spoon inside the cooker to avoid splashing of milk.
  2. Pressure cook in low flame for 2 whistles. Switch off the flame. Open, mash the rice well.
  3. In a pan, melt jaggery and make a thin syrup.
  4. Strain and add the jaggery syrup to the cooked rice when warm. Mix well.
  5. Add the cardamom powder, roasted nuts. Boil in low flame for a minute.
  6. Switch off the flame and serve hot or cold.

BELLAM PARAMANNAM - STEP BY STEP PICTURES

  • Wash the rice. In a pressure cooker base, take the rice, milk + water or milk alone. Add a pinch of salt. Mix well, drop a small plate or spoon inside the Cooker. It helps to avoid splashing of milk while it whistles.  Pressure cook in very low flame for two whistles. 

  • Open the cooker after the steam is released. Remove the spoon. Mash the rice with a whisk and make it mushy.  Add some water if it's too thick. Boil for a minute. Remove and Set aside.

  • In a bowl, take the jaggery and add water. Boil and melt the jaggery completely. Make a thin syrup. No need to bring any consistency. Switch off the flame and let the syrup becomes warm.

  • Strain the syrup in a metal strainer. Add to the cooked rice. Mix well and check for consistency. Add more boiled milk or water if needed. Do not switch on the flame.

  • Heat ghee in a small kadai. Roast the cashews and raisins till golden. Add to the paramannam. Add cardamom powder. Mix well. You can add a pinch of edibke camphor if you like.

  • Now Switch on the flame and keep it very low. Boil for a minute or two. Mix now and then. Do not roll boil. Paramannan should be just heated. Switch off the flame and keep it aside. Serve hot or cold as you like.

  • Enjoy !

Note

  • Adjust the quantity of jaggery as you like.
  • Do not add hot jaggery syrup to the payasam. It may curdle.
  • Instead of pressure cooking, you can cook the rice in an open pot. But keep stirring every now and then to avoid burnt bottom.
  • You can also cook the rice in equal quantity of water and milk.
  • You can add a pinch of edible camphor for more flavor.

Yummy, Andhra style rice kheer with jaggery is ready to serve. Tastes the best when served chilled.


Continue Reading...


August 21, 2018

Garelu Recipe – Crispy Minapa Garelu Recipe - Vada Recipe in Mixie

Garelu


Medu vada / urad dal vada i.e Minapa garelu in Telugu is a popular breakfast and teatime snack recipe all over India. As Varalakshmi viratham is fast approaching, I thought of sharing this Andhra style garelu which is a must to do recipe for Varalakshmi pooja prasad/ neivedyam. My neighbors from Andhra taught me how to make this easy, perfectly crispy minapa vada batter in mixie. I also referred my mixie vada recipe and Mrudula’s cookbook Youtube video for more tips and tricks to make crispy, spongy vada just like hotel ones. Basically urad dal vada is prepared by adding onions  But if we are making for festival and pooja, we should prepare vada without onion. In that case, you can make plain vada or with pepper.

In Andhra, people make it plain without any toppings for Varalakshmi pooja. So I have shared the same in pictures. I have also shared an easy method for shaping vada for beginners. Please refer the video for more details.  As we are grinding the vada batter in mixie, there are certain points to remember to make it perfect. I have listed the tips and tricks below. Please go through the points before you start with this recipe. For grinding more quantity, grind the batter using grinder. Mixie works for small quantity. Ok, Lets see how to make medu vada in mixie with step by step pictures and video.

Check out my Vada recipe using grinder, Pepper vada, Cabbage vada, Mixed vegetable vada and Anjaneyar kovil vadai.


TIPS TO MAKE PERFECT, CRISPY MEDU VADA IN MIXIE

1.Refrigerate the dal while soaking. Soak for 3 to 4 hours.
2.Use ice cold water(dal soaked water) for grinding.
3.Do not add salt while grinding dal.
4.Beat the batter after adding rice flour.
5.Batter should be fluffy and smooth.
6.Refrigerate the batter till use.
7.Add salt and toppings (onion, pepper) only before frying vada.
8.Always grease your hands in water for shaping vada.


minapa garelu recipe

Minapa Garelu Recipe - Crispy Medu Vada Batter in Mixie


Minapa Garelu Recipe - Crispy Medu Vada Batter  in Mixie

Learn how to make Andhra style minapa garelu recipe / Urad dal vada with step by step pictures.


Cuisine: Andhra
Category: Snacks
Serves: 15 nos
Prep time: 180 Minutes
Cook time: 5 Minutes
Total time: 185 Minutes


INGREDIENTS

1 cup - 250ml
  • White round urad dal - 1 cup
  • Ice water - as needed ( I used around 1/3 cup + 1 tbsp)
  • Green chilli - 1
  • Ginger - 1/2 inch piece
  • Rice flour - 1 to 1.5 tsp (Completely optional)
To add in vada batter
  • Big onion - 1 (finely chopped)
  • Curry leaves - Few (-do-)
  • Coriander leaves - 2 tbsp (-do-)
  • Cumin seeds / Jeera - 1/2 tsp
  • Pepper corns - 1/2 tsp (optional)
  • Hing / Asafetida - 1/4 tsp
  • Salt - as needed
  • Cooking oil - to deep fry vada

HOW TO MAKE GARELU

  1. Wash and soak urad dal in required water for 4 hours in refrigerator.
  2. Grind to a coarse paste adding green chilli, ginger, soaked urad dal without adding water.
  3. Wipe the sides. Add 1/4 cup ice water. Grind to smooth paste.
  4. Add more water gradually to make a fine, smooth paste.
  5. Transfer the vada batter to a vessel. Add rice flour if needed and beat the batter well for 5 minutes.
  6. Then add the toppings like onion and other ingredients. Add salt, hing. Mix well and shape vada.
  7. Heat oil and deep fry vada by cooking both sides. Remove and serve hot with coconut chutney  as side dish !

GARELU RECIPE - STEP BY STEP PICTURES

  • Wash and soak urad dal in required water in refrigerator for 4 hours. If not 4 hours, keep the dal inside the refrigerator atleast for an hour. You can also soak the dal without refrigeration and use ice water only for grinding. Ice water helps to prevent mixie jar getting heated.

  •                         
  • In a big mixer jar, take the soaked urad dal by draining all the water completely. Reserve the soaked ice water in a bowl. Add ginger and green chilli. DO NOT ADD SALT. Grind to a coarse paste without adding water. Wipe the sides of jar and grind it well.
  •        
garelu recipe
                     
  • Add 1/4 cup of ice water and grind to paste. Wipe the sides and mix well. Add little more water in few tbsp and grind to a smooth buttery paste without any grits. Do not add more water while grinding. Its the most important point to make perfect vada batter.
  • garelu recipe
                            
  • Vada batter should be thick. It should form a stiff peak when you drop the batter. It is the right consistency. Transfer the batter to a vessel.
  • garelu recipe
                            
  • Add rice flour if necessary and beat the batter for 5 minutes using a whisk. DO NOT USE YOUR HANDS FOR BEATING THE BATTER. Batter may become watery due to the heat of your hands. Vada batter become fluffy and light.
  • garelu recipe
                            
  • Take some water in a bowl. Add a small piece of  Vada batter and check if it floats on top of water. If the batter settles down, you should grind it more or beat more.
  • Add some water to the mixie jar. Grind to wash the jar. Transfer the washed water to a small bowl and use it for greasing your hands while shaping vada.
garelu recipe
  • After beating the batter,  add salt, hing, cumin seeds, Pepper corns (optional) and prepare vada if making for pooja. If you are making for breakfast or snack, add  finely chopped onion, curry leaves, coriander leaves, cumin seeds and pepper corns (optional). Add required salt and hing. Mix well and set aside.
  • Heat oil to deep fry. Drop a pinch of batter to check the heat of oil. To shape vada, take a dosa flipper and grease it with water. Grease your hands with water and take some batter. Keep it on the dosa flipper. Make a hole in the center. Invert the ladle and drop the vada in hot oil. Shake the dosa flipper slightly for the vada to drop in oil Or dip the ladle slightly in oil so that vada releases to the oil as soon as it starts to cook.
  • For method 2 to shape vada : Grease hands with water and take a small portion of batter. Make a hole the center and shape the vada, Drop in hot oil to deep fry.
garelu recipe
  • Flip and cook both sides in medium flame till bubbles cease. Remove the vada and serve.
  • You can enjoy this crispy, hot vada with coconut chutney, sambar or make curd vada and enjoy !
  • garelu recipe

    Enjoy !

Note

  • Do not add salt while grinding the batter.
  • Beat the batter till fluffy after adding rice flour.
  • Deep fry in medium flame for even cooking.
  • Please check the beginning of this post for more tips and tricks.
Try this medu vada recipe easily in mixie and enjoy the festival !
Crispy garelu recipe

Continue Reading...


June 13, 2018

Peanut chutney Without Onion, Garlic–No Onion No Garlic Groundnut Chutney

Peanut chutney without onion and garlic

Recent days I have been trying different type of peanut chutney recipes (Groundnut chutney / Verkadalai chutney in Tamil) in my kitchen. Peanut chutney recipe without onion, garlic and coconut is one among them. This no onion no garlic groundnut chutney tasted yummy with hot idli and dosa. Raksha & Sendhil loved it a lot. The combination of roasted urad dal, chana dal and peanuts worked great for this recipe. I have tried this twice in the last week with some variations by replacing green chillies with red chillies. It tasted good in either ways. But my personal choice is red chillies. You can use any based on your liking. Friends, do try this easy, yummy , no onion no garlic peanut chutney recipe for idli, dosa. You will love it.

Do check out my Easy peanut chutney (Road side hotel style), Peanut tomato chutney, Peanut onion chutney, Peanut chutney with red chillies.

Peanut chutney without onion and garlic


Peanut chutney without onion and garlic


Peanut chutney without onion and garlic

No onion No Garlic Peanut Chutney Recipe For Idli, Dosa


Cuisine: Andhra
Category: Chutney Recipes
Serves: Serves 4
Prep time: 5 Minutes
Cook time: 5 Minutes
Total time: 10 Minutes


INGREDIENTS

1 cup = 250ml
  • Roasted Peanuts – 1/2 cup
  • Chana dal – 1 tbsp
  • White Urad dal – 1 tbsp
  • Red chilli or Green chilli – 4 to 5 nos  ( I used red chilli)
  • Cumin seeds – 1/2 tsp
  • Curry leaves – 5 leaves
  • Cooking oil - 1 tbsp
  • Tamarind - Small piece
To Temper
  • Cooking oil - 1 tsp
  • Mustard seeds - 1/4 tsp
  • Urad dal - 1/4 tsp
  • Curry leaves - Few
  • Hing - a pinch

METHOD

  1. Dry roast peanuts or microwave roast it for 3 minutes in high power.
  2. In a kadai, heat oil and roast urad dal, chana dal, red chilli, curry leaves, cumin seeds.
  3. Switch off the flame and add curry leaves, tamarind and roasted peanuts. Mix well and let it cool down.
  4. Add salt, required water and grind everything to a smooth paste.
  5. Temper the ingredients and add to chutney. Mix and serve with idli, dosa.

METHOD - STEP BY STEP PICTURES

  • In a kadai, dry roast the peanuts till it skin crackles and turns golden brown. Roast patiently in medium flame without burning the peanuts. Alternatively you can roast the peanuts in microwave for 3 minutes in high power ( 800w). I roasted in microwave.

  • Heat oil in a kadai and roast the chana dal, uard dal, red chilli, cumin seeds. Saute in medium flame till dals turn golden. Switch off the flame.

  • Add curry leaves, tamarind and roasted peanuts. Mix well. Let everything cool down.
    Peanut chutney without onion and garlic
  • Then grind to a smooth paste adding required water and salt. Temper mustard seeds, urad dal, curry leaves and hing. Mix well. Serve with hot idli and dosa.
  • Enjoy !Peanut chutney without onion and garlic

Note

  • Adjust the quantity of chillies as per your taste. I personally liked this chutney with red chilli more than green chilli.
  • For variations, you can add a small piece of ginger.
Try this easy, no onion no garlic peanut chutney recipe for idli, dosa and enjoy !
No onion no garlic peanut chutney recipe

Continue Reading...


May 4, 2018

Peanut Red Chilli Chutney Without Coconut For Idli, Dosa

Peanut red chilli chutney for idli dosa
Here is an Andhra style, easy peanut chutney recipe without using coconut, onion and tomato. Its a simple peanut chutney with peanuts & red chilli as the base. Basically Sendhil loves to have varieties of peanut chutney recipes. So I started hunting for some Andhra style peanut chutney. As I had already shared peanut chutney with coconut, onion and tomato, I wanted to try a chutney without these ingredients. I watched some YouTube Video and finally settled with this easy peanut red chilli chutney. If you have roasted peanuts in hand, you can prepare this chutney in the next 5 minutes. It tastes great with hot idli and dosa. I made it mildly spicy. You can add more red chillies based on your taste buds.  Lets see how to make this simple Andhra style Peanut chutney without coconut, onion and tomato.

Peanut chutney without coconut, onion


Peanut Red Chilli Chutney Without Coconut


Peanut Red Chilli Chutney Without Coconut

Easy peanut chutney with red chilli for idli, dosa


Cuisine: Indian
Category: Chutney Recipes
Serves: Serves 4
Prep time: 2 Minutes
Cook time: 2 Minutes
Total time: 4 Minutes


INGREDIENTS

1 cup = 250ml
  • Peanuts - 1/2 cup
  • Red chilli - 4 nos ( I used Byadgi chilli, use 6 for spicy taste)
  • Tamarind - a small piece
  • Garlic cloves - 2 nos or 1 big
  • Coriander leaves - 1.5 tbsp
  • Salt & water - as needed
  • Cooking oil - 2 tsp
To Temper
  • Cooking oil - 1 tsp
  • Mustard seeds - 1/4 tsp
  • Urad dal - 1/4 tsp
  • Curry leaves - Few

METHOD

  1. Roast peanuts in microwave or in stove top. No need to remove its skin.
  2. Heat oil and roast the red chillies. Grind peanuts, red chilli, garlic, tamarind, coriander leaves adding salt & water.
  3. Transfer to a bowl and temper the chutney.
  4. Mix well and serve with hot idli. Stays good for a week if refrigerated.

METHOD - STEP BY STEP PICTURES

  • Roast peanuts in a kadai adding 1 tsp oil. Roast in medium flame without burning the skin. If you roast in microwave, just spread the peanuts in the turn table. Microwave in high power for 2 minutes 30 seconds. ( I used 800w power).
  • Remove the roasted peanuts in a plate. Heat 1 tsp oil in a kadai. Roast the chillies till golden brown. Set aside. I used byadBy chilli for nice colour. You can use Andhra chilli for best taste.

  • In a mixie jar, take the roasted peanuts, red chillies, coriander leaves, tamarind, garlic cloves and salt. 
Peanut red chilli chutney
  • Grind coarsely to a powder without water. Now add water and grind to a smooth paste. Temper mustard seeds, urad dal, curry leaves in 1 tsp oil and add to chutney. Enjoy with hot idli, dosa. 
Peanut red chilli chutney

Note

  • For variations, you can peel the skin of peanuts and grind it.
  • You can also skip coriander leaves. But adding it gives a nice flavor.
  • You can add 1tbsp of grated coconut for variations.
Try this easy, yummy Peanut red chilli chutney without coconut. You will love it with hot idli !
 Peanut chutney without coconut
Continue Reading...


September 17, 2017

Navratri Recipes For 9 Days– South Indian & North Indian Prasadam Recipes

Navratri recipes for 9 days golu at home
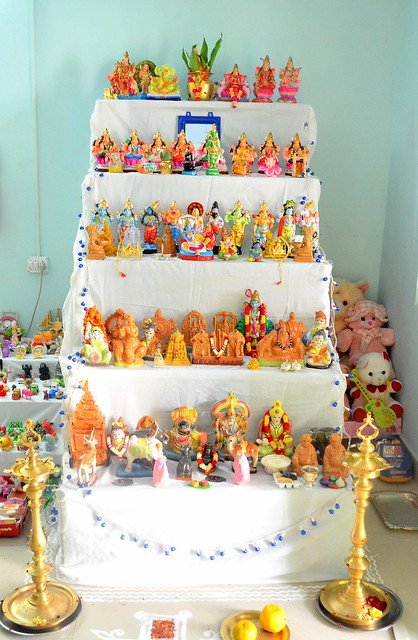
Here is the picture of our last year’s Golu!

South Indian, North Indian Navratri Recipes for 9 days golu at home . In this post, I have framed a list of Navarathri prasadam recipes of Tamil nadu, Andhra and North India for nine days as per my readers request. Last year I made a detailed post on how to keep golu at home. At that time, many of my readers asked me to make a post on Navratri naivedyam recipes list. So today I have come up with the list of prasad recipes like rice varieties, sweets, sundal recipes/snacks based on South Indian and North Indian Navratri festival. Hope this post will be helpful to you all.

Do refer my Navaratri recipes collection for more ideas.

TAMIL NADU RECIPES FOR NAVARATHRI

In Tamil nadu, during Navarathri people worship Goddess Durga for the first three days, Goddess Lakshmi for the second three days and Goddess Saraswathi for the last 3 days. People used to offer some sweets and sundal recipes for God in front of Golu. Even though navarathri is a 9 days festival, the day that comes before Navarathri i.e Amavasya and the day after Navratri where we celebrate the victory of good over evil as Vijayadasami, comes to 11 days. 

Married ladies & young girls are invited to home and we give thaamboolam along with a sundal variety or sweet as Golu prasadham. We usually keep the golu on Pradhamai day evening. So we offer sweet pongal/sakkarai pongal and chana sundal/kondakadalai sundal for neivedyam and we offer some fruits, rock candy on Vijayadasami day.

I have shared this table of naivedyam recipes by referring Nataraja Deekshithar’s blog post. He had given a clear explanation about Navaratri celebration in temples and its importance. He has also mentioned the list of flowers, leaves, kolam, fruits, Neivedyam and Raga to be used for Navratri 9 days. I took the neivedyam recipes, added 2 more recipes for each day morning & evening neivedyam and framed this table. 

I have given different sweet recipes, rice variety and sundal recipes for 9 days. You can alter the sweets and sundal varieties based on your liking. But the rice variety given here is as per the tradition according to Deekshithar’s post. So you can follow the same. I have linked all the recipes to my post. You can click on that to view the respective ones. I am yet to post few sundal recipes in this list. I will do it this week.  

I hope this table would be useful for people who wants to get some ideas for Navratri recipes. Ok, lets check the table below.

GOLU DAY EVENING (If you keep on Amavasya day) SWEET PONGAL CHANA SUNDAL
DAY 1 VEN PONGAL RICE - MOONG DAL, GREEN GRAM SUNDAL(SWEET & SPICE)
DAY 2 RAVA KESARI , TAMARIND RICE ,  KARAMANI SWEET SUNDAL , SPICY SUNDAL 
DAY 3 SAKKARAI PONGAL , PEPPER RICE PARUPPU VADAI PEANUT SUNDAL
DAY 4 WHEAT FLOUR APPAM KADAMBA SADAM, PEAS SUNDAL
DAY 5 RICE PAYASAMCURD RICE, RAJMA SUNDAL OR DOUBLE BEANS SUNDAL
DAY 6 RAVA LADOO COCONUT RICE , FIELD BEANS SUNDAL OR MOONG DAL SUNDAL
DAY 7 RAW RICE IDLI , LEMON RICE KADALA PARUPPU SUNDAL
DAY 8 COCONUT BURFI PAAL SADAM MULTI GRAIN SUNDAL
DAY 9(SARASWATHI POOJA) AKKARA ADISAL 5 RICE VARIETIES OR LUNCH MENU, VADA, BROWN CHANA SUNDAL Or CHANA DAL SUNDAL
DAY 10 (For Vijayadasami) BETEL LEAVES & NUTS, FRUITS, ROCK CANDY OR DRY GRAPES

  Apart from this list, you can refer more recipes in my collection of Navratri recipes post. Do check it !


ANDHRA RECIPES FOR NAVRATRI

In Andhra Pradesh, Navadurga  ( Nine aspects of Goddess Durga) is worshipped during Navratri. Varieties of  prasadam is offered to God on these nine days.


DAY 1 CHALIMIDI, VADA PAPPU, PARAMANNAM
DAY 2 SWEET BOONDI, CHICKPEAS 
DAY 3 RAVA KESARI , PULIHORA
DAY 4 PONGALI
DAY 5 PULIHORA , PESARA BOORELU
DAY 6 ATUKULU, BELLAM, SENAGA PAPPU, COCONUT
DAY 7 KSHEERANNAM, BELLAM, SUGAR
DAY 8 GARELU, LEMON JUICE
DAY 9 CHAKKARA PONGALI
DAY 10 PULIHORA , GARELU

NORTH INDIAN NAVRATRI BHOG FOR 9 DAYS

In North India, People worship nine different forms of Maa Durga.

Day 1 – Maa Shailaputri to bless disease free life
Day 2 - Mata Brahmacharini to increase longevity of family members
Day 3 - Mata Chandraghanta to fulfill all the wishes and provides relief from worldly pains
Day 4 - Maa Kushmanda to improve the intellect and decision making ability
Day 5 - Mata Skandmata to keep the physique healthy
Day 6 - Maa Katyayani for health and happiness
Day 7 - Maa Kaalratri to remove Evil powers
Day 8 - Maa Mahagauri to provide success in life(Kanya puja is performed)
Day 9 - Maa Siddhidatri for all sidhi

People perform fasting, pooja and pray the Goddess by offering nine different bhog on these 9 days. Lets see them below. Sorry, I have not shared Vrat ka recipes ideas. I have just mentioned the sweet recipes and the ingredients you can offer on these 9 days.


DAY 1 PURE GHEE OR RECIPES WITH GHEE
DAY 2 SUGAR, FRUITS
DAY 3 MILK, SWEETS, KHEER
DAY 4 MALPUA
DAY 5 BANANA
DAY 6 HONEY
DAY 7 JAGGERY OR SWEETS WITH JAGGERY
DAY 8 COCONUT,  RICE KHEER FOR KANYA PUJA
DAY 9 TIL or SESAME SEEDS

SOURCE: http://blog.onlineprasad.com/navratri-recipes-bhog-for-nine-days/


DISCLAIMER : I have made this list based on the inputs from various sources. Please alter them according to your tradition by consulting your family elders.

Continue Reading...