Search Chitra's Food Book

Showing posts with label GOKULASHTAMI RECIPES. Show all posts

October 15, 2014

Puzhungal Arisi Murukku, Thattai Recipe - Idli Rice Murukku Recipe - Par boiled Rice Murukku

rice murukku

After almost an year I am sharing my best friend Shalini’s recipe in my blog. Last year same time I posted Madurai masal using baby potato learning from her. After that I couldn’t post her recipes even though I keep trying. This par boiled rice murukku ( idli rice murukku / pulungal arisi murukku) cum thattuvadai recipe is one of the easy and tasty snacks recipe that is apt for this Diwali celebration.Usually we make thenkuzhal for diwali. 

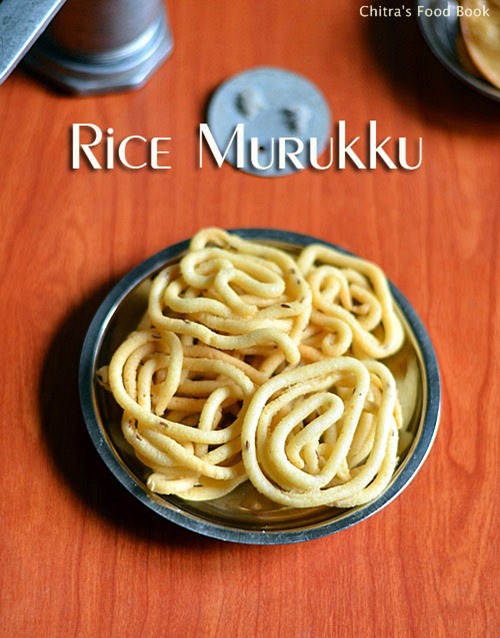
This year, for a change I prepared this murukku by grinding idli rice to a smooth batter and added pottukadalai maavu/fried gram flour. I have already tried this recipe twice during Gokulashtami as kai murukku. Its easy to make spirals with this recipe compared to the raw rice kai murukkuIt tastes super crispy and  comes out white in color too. We all loved it a lot. I really don’t know how to name this murukku.You can call it as rice murukku / arisi murukku, Pottukadalai maavu murukku, butter murukku & even as kai murukku because this recipe suits all these categories. So I have just titled this post as basic “ Puzhungal Arisi/Rice Murukku recipe”. 

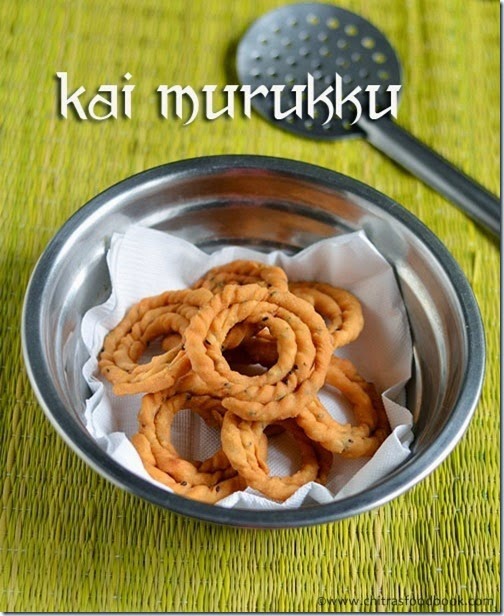
 I made a batch of thattai murukku using the same dough. It came out very flavorful. So this is a two-in-one recipe which is a double dhamaka for Diwali. If you are grinding rice for idli batter, you can take a portion of rice batter and try this murukku and thattai. Shalini suggested me to use star shaped mould and make shapes like Chakli/Mullu murukku. As my family is not fond of star murukku, I used my thenkuzhal mould and another small holed mould which I bought recently from Kumbakonam. Raksha loved the thin murukku a lot. 

There are certain steps to be followed carefully to make this murukku crispy and white. So check out my “Notes” section before you start this recipe. Ok, Lets see how to make crispy rice murukku recipe for Diwali using idli rice. You can easily prepare this murukku by reserving some rice batter while you grind for making idli,dosa batter.Try n let me know your feedback.


Murukku-recipe


puzhungal arisi thattai recipe

Puzhungal Arisi Murukku/thattu vadai recipe


Murukku/thattu vadai recipe Murukku and thattai recipe using idli rice & fried gram flour / pulungal arisi and pottukadalai maavu. 
Cuisine: Indian
Category: Snacks
Serves: 15 
Prep time: 2H10Min
Cook time: 20Min
Total time: 2H30Min


INGREDIENTS
1 up - 250ml
For murukku
  • Idli rice /Par Boiled rice/ Salem rice / puzhungal arisi - 1 cup
  • Fried gram flour  / Pottukadalai maavu - 1/4 cup
  • Softened butter - 1 tbsp (Levelled)
  • Hing/Asafetida - 1/4 tsp
  • Jeera/Cumin seeds - 1.5 tsp
  • Salt & water - as needed
  • Cooking oil - to deep fry
For thattuvadai
  • Red chilli powder - 1/2 - 1 tsp
  • Chana dal - 1 tbsp (Soak in water for an hour)
  • Finely chopped curry leaves - few
METHOD

  • Wash and soak the idli rice / puzhungal arisi for 2 hours. Drain all the water completely. Grind it to a smooth batter adding little water as much as possible. To use less water,first grind the rice to a coarse powder. Then add water little by little and grind for longer time to make a smooth paste. Remove the batter. If you feel the batter is watery, put it in the cotton cloth for a minute. Cloth will absorb all the excess water but be careful, batter should not become too dry. There should be some moisture.( Ground rice batter should be used immediately). 
murukku-step1
murukku-step2
  • To this batter add ground fried gram dal powder, softened butter, salt and hing. Mix well till butter incorporates well into the flour. The dough should be soft, non-sticky but not dry. Take a small portion of dough and fill the murukku mould.  Cover the remaining dough with a wet cloth to prevent drying. 

Murukku mould
  • Heat oil , simmer the flame and press the murukku directly in hot oil or drop the pressed murukku from a ladle. Deep fry both the sides till “ssh” sound and bubbles cease. Adjust the flame whenever needed. Remove and drain the oil in a tissue paper. Cover the unused dough with a wet cloth.
murukku-step4
  • If you are making thattai, take some murukku batter and add red chilli powder or pepper powder, finely chopped curry leaves and soaked chana dal. Mix well and pat it thin to make a small roundels using a tumbler base. Keep it in a cloth. Pierce it with a fork to avoid puffing. Drop them in oil and deep fry both the sides, remove and drain in a tissue.

thattuvadai-step
Enjoy !


Note


  • This murukku absorbs more oil when compared to raw rice thenkuzhal. Please keep this in mind.
  • The first & most important point is rice should be ground very smooth using as much less water as possible. So grind it for long time adding water little by little. Do not add all the water at a time. 
  • If you feel the batter has excess water, just put the batter in a cotton cloth for 1-2 minutes and remove. The cloth will absorb all the excess water. U should make murukku immediately after grinding the batter else batter may become sour and color of murukku will change. Murukku drinks more oil too.
  • Do not grind the rice batter very thick n dry because after you add butter & gram flour, murukku dough will become even more thick and murukku will break with serrated edges while cooking in oil. So dough should be wet,soft but non-sticky.
  • The butter should be soft and at room temperature. Do not use melted butter.The butter has to be well spreaded with the flour. Else murukku won’t come out crispy.
  • Do not use butter more than the mentioned quantity, murukku will become oily. Adding little lesser butter is fine but color will change slightly.
  • U can replace 1/4 cup of pottukadalai maavu by 1/8 cup of roasted urad dal flour & 1/8 cup of pottukadalai maavu/fried gram flour if  you want murukku to be more flavourful like thenkuzhal.
  • U can replace butter with ghee or hot cooking oil but iam not sure about the color of murukku.

rice-butter-murukku

Enjoy making murukku and thattuvadai using this recipe and have a fun filled Diwali celebration!

 Murukku-thattuvadai

Continue Reading...


September 3, 2014

Unniappam/Unniyappam Recipe-Kerala Onam Sadya Recipes


Unniyappam-recipe
Kerala style sweet appam recipe is known as Unniyappam/Neyappam.I have tasted this several times from my neighbour.It looks dark brown in color with sugar coated on it.I love it a lot.When i was thinking of Onam sadya recipes,i reminded this recipe and asked my neighbour Mrs.Prema about it.She told me an easy , no fermentation method which she learnt from her mom.I also referred Kothiyavunu for some tips to get soft unniyappam.I tried it for the first time today and it came out very well.I was able to achieve the same color & taste of my neighbour's unniappam.It tastes crispy outside & soft inside.As my neighbour suggested, i coated all the appam with sugar which is not usually done in Kerala i guess.But it gave an appealing look to the dish. Also she told me to deep fry the appam but i did it in my paniyaram pan to get a nice shape.I gave some of them to my friends and everybody liked it a lot.I am sure Sendhil would love it too.Thanks to my neighbour for teaching me this yummy sweet appam recipe. Try this dish for Onam festival.I am sure u will love it like us.Lets see how to make this kerala style unniyappam recipe in detail.
Unniappam recipe

Unniyappam recipe


Unniyappam recipe Kerala style unniyappam recipe for Onam festival.
Cuisine: Indian
Category: Sweet
Serves: 10 nos
Prep time: 2 Minutes
Cook time: 10 Minutes
Total time: 12 Minutes


INGREDIENTS
1 cup - 250ml
To soak
  • Raw rice - 1/2 cup ( use high quality Sona masoori)
  • Water - as needed
To Grind & mix
  • Grated jaggery - 1/2 cup
  • Banana - 1 no
  • Urad Papad - 1 no ( any brand) or urad dal - 1 tbsp (soak with rice)
  • Cardamom - 2 nos
  • Grated coconut - 1/3 cup
  • Ghee – 1 tbsp
  • Black sesame seeds – 1/2 tsp
  • Ghee roasted coconut bits – 1 tbsp
  • Oil + ghee – to cook
  • Cooking soda – a pinch (optional,i dint use)
METHOD

  • Wash and soak the raw rice for 2 hours.Drain all the water completely and spread the rice in a paper for 5-10 minutes.Now grind the rice to make a fine powder.Set aside.Soak papad in little water till use.
How to make unniyappam 1
  • Take jaggery in a wide bowl and add little water to cover it.Melt & strain it.Boil it for a minute till it becomes frothy.Add this syrup to the rice flour & set aside.
  • In a mixie jar,take the soaked papad,cardamom seeds,grated coconut & banana.Add little water and grind them to a smooth paste.Add this paste to the rice flour,jaggery mixture.Mix well and set aside.
How to make unniyappam 2
  • Add ghee roasted coconut bits & sesame seeds along with ghee to the batter.Mix well.Take a paniyaram pan and add 1/2 tbsp of oil + 1/2 tbsp of ghee to each mould.The oil +ghee mixture should cover half of the mould
unniyappam recipe 1
  • .Heat it.Now pour the batter in each mould.Unniyappam will cook in the oil and oil spreads all over the pan.Keep the flame medium high and let it cook till it becomes golden brown or dark brown as u wish.Flip it and again cook for few minutes.Remove in a tissue paper.Roll it in a  plate of sugar if u like the sugar coated ones.
Unniyappam recipe 2

Enjoy !
Note
  • The batter should not be too thick or too thin.It should be pourable.
  • Always add jaggery in syrup form after straining the impurities..
  • Adding soaked papad gives softness to the appam.No need to add cooking soda or ferment the batter.
  • If u wish,u can also leave the batter for 2 hours & ferment it.
  • The color of appam may very based on the color of jaggery and the heat of pan. 
  • This appam stays good for 1-2 days..


Enjoy this crispy and soft Unniyappam recipe for Onam sadya ! Tastes yum !
Unniappam recipe

Continue Reading...


August 17, 2014

EASY AVAL PANCHAMIRTHAM RECIPE / POHA PANCHAMRIT - EASY GOKULASHTAMI RECIPES

Happy-krishna-jayanthi
We celebrated Krishna Jayanthi pooja early today as Sendhil is leaving to Norway for an official trip.My in-laws are here with us and we had a great celebration.My MIL made this Panchamirtham using poha/Aval and mixed fruits.It was so nice.Last year we performed Ganapathi Homam in our house. At that time,priest made this aval panchamirtham to offer in Homam and he gave us as Prasad too.My MIL reminded that and she made it today for Naivedyam as Lord Krishna is fond of both Aval & fruits. It was delicious & it took just few minutes to prepare.She also told me to blog this recipe for people who cannot make deep fried stuffs.It can be prepared even in the last minute before pooja. Friends,if you are looking for some easy,no cook aval recipe for krishna janmashtami,just try this.Offer this to God along with fruits,curd,milk & butter. I am sure Krishna would be pleased and bless us !
easy krishna jayanthi recipes

Easy panchamirtham recipe with poha & mixed fruits


Easy panchamirtham recipe with poha & mixed fruits Easy aval/poha & mixed fruits panchamirtham recipe for Krishna jayanthi
Cuisine: Indian
Category: Sweet
Serves: Serves 4
Prep time: 5 Minutes
Cook time: 5 Minutes
Total time: 10 Minutes


INGREDIENTS
1 cup - 250ml

  • Poha/aval ( thin or thick) - 1/4 cup
  • Honey - 1 tbsp
  • Grated jaggery - 1-2 tbsp
  • Small Banana - 1 no
  • Small apple - 1/2 no
  • Pomegranate - a handful
  • Mosambi - 2 pieces (optional)
  • Mango – 4 small cubes
  • Guava - 1/4 no(optional)
  • Ghee - 2 tsp
  • Cardamom crushed - 1 no
  • Edible camphor – a pinch (optional)
METHOD

  • Wash the poha twice,drain and set aside.In a wide bowl,take the washed poha,chopped mixed fruits,honey,Ghee,grated jaggery,crushed cardamom and edible camphor.Mix well.
  • Give a standing time of 30 minutes before u consume.Poha will become soft.
Offer to GOD!
Enjoy !


Note

  • Adding guava is optional.
  • U can use either thin or thick aval.
  • Adjust the quantity of jaggery & honey as per the taste.


Make this easy panchamirtham recipe for krishna jayanthi & offer GOD !!

aval Panchamirtham

Continue Reading...


August 14, 2014

KAI MURUKKU RECIPE | HOW TO MAKE SUTHU MURUKKU | KRISHNA JAYANTHI RECIPES

Kai murukku recipe

My MIL has the practice of making Kai murukku for Gokulashtami festival. People in Tamil nadu make this murukku generally for festivals and occasions like Seemandham & marriage as seer murukku. My MIL usually says my husband’s grandmom ( ie My mil’s MIL) is an expert in making perfect swirls. My MIL also makes it very fastly & iam still learning from her. Of course swirls come only by practice.

Last year I tried kai murukku using idli rice following my friend Shalini’s recipe. It came out very well & I found it easy for twisting too. I will try to post that recipe very soon. But for festivals, we are supposed to use only raw rice/Pacharisi. So this time I wanted to try this raw rice kai murukku for krishna jayanthi. I got this recipe from my MIL and tried it for the first time. I also referred “Ammavin samayal” kai murukku video for making twists. My twists/swirls din’t come out perfect but the taste was great. Sendhil liked it very much. As every beginner’s hope, I too believe I can make perfect suthu murukku at least by next year.


There are some points to be noted to make a perfect kai murukku. First & foremost thing is “You should use only homemade processed rice flour and roasted urad dal flour”. Store bought rice flour never works.The flour should be very smooth in texture. Also, you should start making this murukku as soon as u grind the rice flour.ie, processed rice flour should be wet. If you allow the homemade flour to dry for long time,u won’t be able to make swirls properly. It will get cut. We should not add too much of butter because murkku will drink oil.

The ratio of Rice flour & urad dal flour should be 8:1.  I have shared some of the remaining tips & tricks in “Notes” section. Do have a look before you start making. Ok, Lets see how to make Kai murukku at home with step by step pictures.

kai-murukku


Kai murukku recipe


Kai murukku recipe How to make kai murukku for Gokulashtami/Krishna jayanthi
Cuisine: Indian
Category: Snacks
Serves: 10
Prep time: 2 Hours
Cook time: 10 Minutes
Total time: 2H10 Minutes


INGREDIENTS

METHOD

  • Take the homemade processed wet rice flour, urad dal flour, sesame seeds, salt and hing. Mix well. Now add soft butter and mix well with the flour. Butter should be well mixed with the flour. Lastly add water little by little and make a non-sticky dough.
Kai murukku 1
Kai murukku 2
  • Take a small lemon sized ball and try to make swirls using your fingers. If you are able to make it, proceed further. If u find the thread getting cut, dough must be dry. So sprinkle little more water in the dough and knead it well. Apply little oil on your hands if the dough is sticky.
Kai murukku 3
  • Spread a cotton cloth or butter paper and place a small bottle lid. Keep a small bowl of water & a bowl of oil nearby. Take a small lemon sized ball from the dough.
  • Make the swirls/murukku around the lid. While making the swirls,keep your hand a little higher from the lid.The dough will stretch easily if u made it perfect. When u hold ur hand higher in length, u can make the twist easily.
  • U can dip ur hands in water whenever needed. It helps u to make twists neatly.
  • Use ur first three fingers ( ie thumb, fore finger & big finger) and press the dough with ur thumb, make a twist and keep doing it to form a circle shape. It sounds bit difficult but it will come by practice for sure. Keep the remaining dough closed with a wet cloth to prevent drying.
  • Make some 10 murukkus & heat oil in a pan for deep frying. Drop a small piece of dough. If it rises immediately, oil temperature is correct. Now remove the murukku using ur hand or dosa flipper and drop in oil carefully. U can slide it in the sides. It will move to the center. Add 3-4 murukku per batch and deep fry.
Kai murukku 4
  • Cook till the bubbles and sshhh sound ceases completely. Flip it once in the middle. Remove the murukku, drain in a tissue paper. Allow it to cool & Enjoy !
Kai murukku 5
  • For storage,keep a tissue paper in a box and arrange the murukku after it cools down completely. The original flavour of murukku can be felt only by next day.U can store it for months too.It tastes crunchy and yummy.


Note

  • You should use only homemade processed rice flour and roasted urad dal flour”. Never roast the rice flour. It should be wet. Store bought rice flour never works. The flour should be very smooth in texture. Also you should start making this murukku as soon as you grind the rice flour. i e, processed rice flour should be wet. 
  • If u allow the homemade flour to dry for long time, you won’t be able to make swirls properly. It will get cut. We should not add too much of butter because murkku will drink oil. The ratio of Rice flour & urad dal flour should be 8:1
  • Grease your fingers with oil whenever needed while making twists.
  • For trouble shooting : If u find the thread getting cut while making twists, dip ur hand with murukku dough in water slightly and press the dough. Dough will become slightly wet. Now u can make twists easily.
  • Never use store bought rice flour for making dough.
  • Homemade rice flour should be slightly wet while making dough. U can use oil for greasing ur hands if u feel the dough is sticky.
  • Less butter should be added. Adding more butter makes the murukku absorb more oil.
  • Here Urad dal flour gives the stretchable tendency to the flour. So never skip or replace it.
  • Some people also use gram dal flour but it works well with idli rice kai murukku & not with raw rice murukku.

Is my kai murukku looks somewhat OK ?? 
I will try to make it perfect in future by practice and update the pictures for sure. 

kai-murukku-recipe

Continue Reading...


August 12, 2014

Krishna Jayanthi Recipes | Gokulashtami Recipes - Krishna Jayanthi Special recipes

Krishna jayanthi recipes

Here is a list of Gokulashtami recipes with video.  Most of the recipes are South Indian Krishna jayanthi recipes. I have also shared a few North Indian style Krishna Janmashtami recipes. Gokulashtami / Krishna Jayanthi / Janmashtami is celebrated as the birthday of Lord Krishna. It falls on 8th day of Krishna paksha of Shravana month (August-September). This year 2023, it falls on September 6th, Wednesday evening.

Both South Indian and North Indian people celebrate this festival at home in a grand manner by offering Lord Krishna’s favorite sweets and snacks. So I thought of sharing all the Krishna jayanthi / Gokulashtami special naivedyam recipes under one page for easy reference. 

In Tamil nadu, people keep all the varieties of fruits, Butter, Milk, Curd, Aval/Poha mixed with jaggery along with sweet seedai/vella seedai, uppu seedai, kai murukku, sweet appam and Paal payasam for neivedyam/prasadam. I have made a video for these 5 recipes. Do watch it.

In this page,  I have shared the links of how to make homemade rice flour, Urad dal flour for making seedai and murukku, Vella seedai/Sweet seedai recipe, Salt seedai/Uppu seedai recipe, Seedai using store bought rice flour, Easy Nei appam/Ghee appam, Kai murukku, Chakli, Thattu vadai recipe and Payasam recipes. I have also shared few Karnataka and North Indian recipes for janmashtami along with some tips to avoid bursting of seedai. Beginners can try some of the easy recipes like kheer and appam from the list.

 Generally pooja has to be done at midnight. But we make pooja in the evening after 6 pm. My MIL says butter, milk, curd and rice flakes with jaggery are the most important for offerings even if you are not able to prepare other sweets and snacks because these are Krishna’s Childhood favorites. Here is the picture of our Lord Sri krishna with offerings. Wish you all a very happy Krishna jayanthi.

Gokulashtami recipes


Do check out my Krishna Janmashtami Pooja procedure post if you are interested to know our puja methods. I have made a video on how to make uppu seedai & vella seedai using store bought rice flour, butter murukku, paal payasam and sweet appam using wheat flour. Hope beginners would find it useful. Please watch the video below.


Krishna Janmashtami recipes

I have shared the links of all Gokulashtami recipes below. Click on the picture to view the respective recipes. Do visit my Krishna Janmashtami Pooja procedure post if interested.

Gokulashtami recipes

                                 Homemade rice flour for seedai,murukku


Homemade Rice flour


Homemade urad dal flour
Homemade Urad dal flour

Sweet seedai / Vella seedai
Sweet Seedai / Vella Seedai

Uppu seedai / Salt seedai
Uppu Seedai / Salt seedai

Kai murukku
Kai Murukku recipe

Easy, instant Nei appam
Nei appam / Ghee appam

Vermicelli kheer / Semiya payasam
Vermicelli Kheer / Semiya Payasam

Sweet appam with banana
Sweet Appam with banana, wheat flour

Aval payasam with jaggery
Aval Payasam with jaggery

Uppu seedai & Vella seedai using store bought rice flour
Seedai using store bought rice flour

aval murukku
Aval murukku / Poha chakli


Poha Kheer/Choora kheer 
Poha Kheer / Aval payasam with sugar

Gopalkala recipe
Gopalkala / Dahi Poha

 Aval ladoo / Poha laddu
Aval ladoo / Poha laddu

 Rava ladoo
Rava ladoo / Suji laddu

 Wheat flour appam-Deep fried version
Wheat flour appam – Deep fried

 Thinai Nei appam 
Thinai Nei appam/ foxtail millet sweet appam
   
Parboiled rice murukku

Easy aval Panchamirtham
No cook aval panchamirtham

Easy Paal Kozhukattai
Easy Paal Kozhukattai with sugar

Paal Payasam recipe
Paal Payasam recipe

Butter murukku
Butter murukku

Microwave Rava Kesari

Paal Kesari/Milk Kesari
Milk kesari / Paal kesari

Rava Kesari recipe
Rava Kesari

Curd Koubale/Ring murukku
Curd Kodubale

Instant chakli / murukku recipe

Easy atta halwa
Easy Atta Halwa / wheat flour halwa

Sooji ka halwa
Suji Halwa / Sooji halwa recipe


Other than the above mentioned recipes, you can also make Rice payasam with jaggery, Urad dal vada and Some ladoo varieties if interested.

TIPS TO AVOID BURSTING OF SEEDAI

Most of us are afraid of making seedai just because it bursts. But when you follow these tips properly, seedai never burst & it comes out super crunchy and tasty. Here are some of the tips I learnt from my mom & MIL to avoid bursting and to make a perfect sweet seedai & salt seedai recipes. Happy Krishna Jayanthi :)
  • You must roast the wet flour for few minutes in low flame if you are using homemade processed rice flour. For store bought rice flour, this step is not needed. Roasting is needed for store bought idiyappam flour.
  • First important thing to avoid bursting is to “SIEVE” the flour once or twice. U should sieve all the flour ( urad dal flour, rice flour). Sieving the flour properly reduces 90% of bursting.
  • Secondly u should not roll the seedai very tightly. U should roll it to a loose ball using three fingers. No problem if its not a proper round..
  • One more tip is to prick the seedai with a small needle to avoid bursting.. Dry the seedai in a paper or towel for 20 minutes before frying.This is also very important.
  • Beginners can try deep frying few seedai in “small tempering kadai” . If it comes out well , proceed in a big kadai. Color variations may be there slightly. But you can check whether it bursts or disperses in oil..
  • If sweet seedai breaks or dissolves in oil , it means jaggery may be more or oil temperature is too high or too low.
  • If Seedai bubbles too much after you drop into oil , it shows the fat ( ghee or butter or oil) content is more..So add more rice flour to the dough & make again..
  • The color of seedai depends on the color of urad dal flour. If you roast the dal to golden brown, seedai will also turn brown.
  • Uniform heating is also important. In my observation , I feel low to medium flame is enough to get a nice colored and crispy seedai.
Check out these links for my sweet seedai & uppu seedai recipes :

WISH U ALL A VERY HAPPY KRISHNA JAYANTHI CELEBRATION.
ENJOY WITH SEEDAI and MURUKKU !!

Krishna Jayanthi Recipes
Continue Reading...