Search Chitra's Food Book

Showing posts with label KUZHAMBU VARIETIES. Show all posts

February 20, 2017

Instant Mor Kuzhambu – Easy Mor Kulambu Recipe Without Coconut– Indian Bachelors Recipes

Easy mor kuzhambu recipe without coconut
Mor kuzhambu ( Vegetarian buttermilk gravy in English) is our family favorite kuzhambu varieties for rice. Usually I follow my MIL’s or MOM’s recipe. But sometimes I make this easy mor kuzhambu recipe when I have to cook for myself and Raksha as Sendhil is not fond of this version. Its a very simple, no grind mor kuzhambu recipe without coconut. I started making this by following Revathy Shanmugam mam’s recipe from Aval vikatan supplementary issue. But then I made some changes and making it in my own way! I won’t say this one tastes so good like authentic more kuzhambu. But this recipe is surely a quick fix for bachelors & working women who wants to whip up a gravy within 10 minutes for lunch or dinner after coming back from office. It tastes great with fried papad and potato fry or brinjal roast. I served it with yam fry. The taste of this kuzhambu reminds me North Indian style Dahi kadhi slightly. This kulambu can be prepared with or without vegetables.Sometimes I add fried manathakkali or sundakkai vathal too. If you wish to add vegetables, you can add cooked lady’s finger (Vendakkai) or pumpkin( Poosanikai in Tamil). Do try this easy, Instant mor kuzhambu recipe and let me know your feedback ! Lets see how to make South Indian style Mor Kuzhambu with step by step photos.

Continue Reading...


December 28, 2016

Easy Ennai Kathirikai Kuzhambu Recipe Without Coconut – Chettinad Brinjal Gravy

Chettinad ennai kathirikai kuzhambu
Basically ennai kathirikkai kuzhambu ( Oil roasted brinjal gravy) is prepared by using freshly roasted and ground spices with coconut.I make my MIL’s pepper flavored ennai kathirikai kulambu at least once in a week as it is Sendhil’s one and only favorite brinjal recipe. Recently I tried this easy, no grind, Chettinad style ennai kathirikai kuzhambu without coconut just for a change. 

I followed the recipe from THIS BLOG. I loved it a lot with plain rice and papad/appalam. Its more like my vatha kuzhambu recipe but the flavor of masala coated, roasted brinjals in lots of oil makes a great difference in taste, color and flavor for this kuzhambu. Soon I will make a post about authentic ennai kathirikai kuzhambu recipe. Before that, do try this easy version. I hope you will like it. Now lets see how to make Chettinad ennai kathirikai kuzhambu with step by step pictures !

Don’t forget to check out my Ennai kathirikai poriyal , Brinjal masala kuzhambu , Brinjal masala fry, brinjal gravy for biryani !

Chettinad ennai kathirikai kulambu recipe

Chettinad Ennai Kathirikai Kuzhambu Recipe


Chettinad Ennai Kathirikai Kuzhambu Recipe Easy version of Ennai kathirikai kuzhambu  without coconut - Chettinad style no grind brinjal gravy
Cuisine: Chettinad
Category: Kuzhambu varieties
Serves: Serves 4
Prep time: 10 Minutes
Cook time: 20 Minutes
Total time: 30 Minutes


INGREDIENTS
1 cup - 250ml
  • Small sized brinjal - 10 nos
  • Small onion / Chinna Vengayam - 10 nos
  • Garlic cloves- 10 nos
  • Tomato - 1 no ( country variety/Naatu thakkali)
  • Tamarind - Small lemon sized
  • Red chilli powder -  2-3 tsp ( Kashmiri chilli pwd)
  • Coriander powder/Dhania powder - 2 tbsp
  • Salt & water - as needed
To temper
  • Sesame oil / Gingely oil - 1/4 cup 
  • Mustard seeds - 1 tsp
  • Fenugreek seeds - 2 pinch
  • Curry leaves - few sprigs
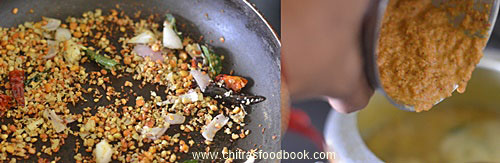
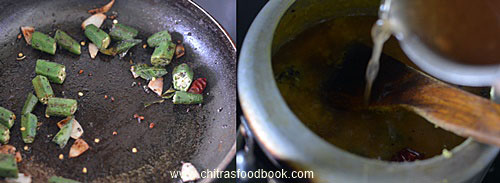
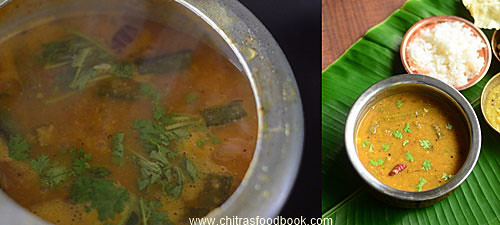
HOW TO MAKE ENNAI KATHIRIKAI KUZHAMBU - METHOD

  • Wash the brinjal. Mark X on the top of brinjals till half its way without cutting its stem part. Immerse them in water till use.  Soak small lemon sized tamarind in 1 cup of hot water. Take the extract and set aside. Peel onion, garlic and keep aside.
    Chettinad ennai kathirikai kulambu recipe
    Chettinad ennai kathirikai kuzhambu recipe
  • In a small bowl, take 1 tbsp tamarind extract, red chilli powder, dhania powder, turmeric powder and salt. Mix well to make a thick paste. Fill the brinjals with this paste.Arrange in a plate.
    Chettinad ennai kathirikai kuzhambu recipe
    Chettinad ennai kathirikai kuzhambu recipe
  • Heat 1/4 cup sesame oil in a pressure cooker base ( I used cooked to make the gravy quickly and to save time) Reduce 1 tbsp oil if you feel too much of oil. You can make  this gravy in a kadai as well.Splutter mustard seeds, methi seeds, curry leaves.Add the small onions, garlic cloves and saute till onion turns transparent.
    Chettinad ennai kathirikai kuzhambu recipe
  • Add the masala stuffed brinjal pieces along with the remaining masala and saute well till the brinjal shrinks a bit.Add finely chopped tomato pieces, mix well for a minute. Add tamarind extract, 1/2 cup more water, salt and mix well. Let it come to a roll boil. Cover and pressure cook for one whistle in very low flame.Let the steam release by itself and then open the lid.
  • If cooking in a kadai, cover with a lid and cook till brinjal turns soft and gravy turns thick as you wish. Gravy thickens and oil oozes out. Mix well and serve with plain rice, papad !
    Chettinad ennai kathirikai kuzhambu recipe
    Chettinad ennai kathirikai kuzhambu recipe
    Chettinad ennai kathirikai kuzhambu recipe
    Enjoy !

Note
  • Do not reduce the quantity of dhania powder as it helps to thicken the gravy.
  • You can replace red chilli powder + dhania powder with sambar powder too.
  • You can also add a small piece of jaggery if you like.
  • Add more chilli powder if you like spicy kuzhambu.
  • This gravy stays good for a week even without refrigeration as we are adding more oil.


Try this easy ennai kathirikai kuzhambu. Serve with plain rice, enjoy !
I had with plain papad. Yum!!
Easy ennai kathirikai kuzhambu recipe
Continue Reading...


December 6, 2016

Vendhaya Keerai Kara Kuzhambu – Methi Leaves Gravy Recipe

Vendhaya keerai kuzhambu
Usually I make Vendhaya keerai kootu, vendhaya keerai sambar or methi pulao for lunch. If its for dinner, I make Vendhaya keerai chapathi i.e methi leaves paratha ( thepla). Recently when I was looking for some vendhaya keerai kuzhambu varieties, I came across this Kara kulambu in this blog. It was quite interesting just like our vatha kuzhambu. So I tried it for our lunch. We loved it a lot and enjoyed it mixing with plain rice. I was happy to learn yet another yummy, healthy gravy recipe using methi leaves. I am sure I will make it often in my kitchen. Do try this easy, no grinding vendhaya keerai kuzhambu for your lunch and reap its health benefits. You will love it like us. Ok, Lets see how to make vendhaya keerai kara kuzhambu with step by step pictures !
Vendhaya keerai kara kuzhambu

Vendhaya Keerai Kuzhambu Recipe / Methi leaves gravy


Vendhaya Keerai Kuzhambu Recipe / Methi leaves gravy How to make vendhaya keerai kuzhambu recipe - Methi leaves gravy for rice
Cuisine: South Indian
Category: Kuzhambu varieties
Serves: Serves 2-3
Prep time: 10 Minutes
Cook time: 10 Minutes
Total time: 20 Minutes


INGREDIENTS
1 cup - 250ml
  • Methi leaves/ Vendhaya keerai – 1/2 cup
  • Tamarind - Big gooseberry size
  • Tomato – 1 no (small, finely chop)
  • Red chilli powder - 1 tsp
  • Coriander powder/Dhania powder – 1.5 tsp
  • Turmeric powder - 1/4 tsp
  • Grated jaggery – 1 tsp
  • Salt & water - as needed
To temper
  • Cooking oil - 2 tbsp
  • Mustard seeds - 1/2 tsp
  • Cumin seeds - 1/2 tsp
  • Green chilli – 1 no ( slit)
  • Small onion - 10 nos ( finely chopped)
  • Garlic cloves - 10 nos ( finely chopped)
  • Curry leaves - few
METHOD

  • Soak tamarind in hot water for 10 minutes and take the extract using 2 cups of water. Keep it apart.Take the methi leaves, wash it well and set aside. Wash and chop the tomato, onion, garlic and curry leaves. Slit the green chilli.
    Heat oil in a kadai and splutter mustard seeds, cumin, urad dal.Saute the onion, green chillies, garlic cloves and curry leaves. Now add the tomato pieces and saute till mushy.
    Vendhaya keerai kara kuzhambu recipe
  • Now add the methi leaves and saute till it shrinks in quantity. To this, add red chilli powder, turmeric powder, dhania powder and required salt. Mix well in low flame without burning the spice powders.
    Vendhaya keerai kara kuzhambu recipe
  • Add the tamarind extract , jaggery and boil the gravy till thickens and oil starts to float on top. Check for taste and add more red chilli powder or salt if needed. Boil for few more minutes. Remove and serve hot with rice..
    Vendhaya keerai kara kuzhambu recipe
    Vendhaya keerai kara kuzhambu recipe
Enjoy !

Note
  • Adjust the quantity of red chilli powder and green chillies as per your taste.
  • Do not reduce the quantity of tamarind. Gravy may taste bitter.
  • You should saute the methi leaves well to reduce its bitterness completely.

Try this easy, healthy methi leaves gravy at home for rice. Enjoy with any kootu or poriyal along with papad. Tastes yum !
Vendhaya keerai kara kuzhambu recipe
Continue Reading...


November 21, 2016

Kakarakaya Pulusu Recipe – Andhra Style Bitter Gourd Gravy

Andhra Kakarakaya pulusu recipe
Kakarakaya ( Bitter Gourd in English, Pavakkai in Tamil, Karela in Hindi) is a very healthy and diabetic friendly vegetable. I make bitter gourd recipes at least once in a week. Usually I prepare bitter gourd curry, Chettinad puli kuzhambu or Pavakkai pitlai. 

Kakarakaya Pulusu is an Andhra style bittergourd gravy made by frying bitter gourd pieces in oil and its added to a spicy gravy. But I came across an easy, one pot, Andhra style Kakarakaya Pulusu ( Pulusu means Kuzhambu/Gravy in Telugu) in a Youtube video. I tried it for lunch along with brinjal masala poriyal. It tasted very well without much bitterness. 

Bitter gourd lovers like me must try this recipe. Addition of jaggery (Bellam), tamarind and thinly sliced bitter gourd sauted in oil helps to reduce the bitterness I feel. So friends, do try this Andhra special Kakarakaya Pulusu recipe for rice. I am sure you will enjoy it. Now lets see how to make it with step by step photos !

Check out my other ANDHRA RECIPES as well.

Check out my green brinjal curry recipe in the picture if interested.

Kakarakaya pulusu recipe

Kakarakaya Pulusu Recipe - Andhra Bitter Gourd Gravy


Kakarakaya Pulusu Recipe - Andhra Bitter Gourd Gravy How to make Andhra style Bitter Gourd Gravy for rice - Kakarakaya pulusu recipe
Cuisine: Andhra Recipes
Category: Side dish for rice
Serves: Serves 2-3
Prep time: 10 Minutes
Cook time: 20 Minutes
Total time: 30 Minutes


INGREDIENTS
1 cup - 250ml
  • Bitter gourd - 1 no ( Medium sized)
  • Tamarind - Big gooseberry size
  • Big onion - 1 no ( chopped)
  • Green chillies -2 nos
  • Ginger & Garlic paste - 1/2 tsp ( or use 1/2 tsp Ginger paste)
  • Red chilli powder - 1.5 tsp to 2 tsp
  • Dhania powder - 1 tbsp
  • Salt & water - as needed
  • Grated jaggery - 2 tsp
To temper
  • Cooking oil - 3 tbsp
  • Mustard seeds - 1/2 tsp
  • Urad dal - 1 tsp
  • Curry leaves - few
  • Hing - a pinch
  • Coriander leaves - to garnish
HOW TO MAKE KAKARAKAYA PULUSU - METHOD

  • Wash and cut the bitter gourd vertically. Remove the middle portion along with the seeds. Slice it thinly as shown in the picture below. These steps will help you to remove the bitterness to a certain extent.So slice it thinly.
    Kakarakaya pulusu
  • In a pressure cooker base, heat oil and splutter mustard seeds, urad dal, cumin seeds, curry leaves. Add bitter gourd slices, saute till it becomes soft. Add onion, gg paste and saute till its raw smell goes off. Add slit green chillies and saute for few seconds. Bitter gourd turns dark green in color.
    Kakarakaya pulusu
    Kakarakaya pulusu
  • Now add the red chilli powder, turmeric powder, dhania powder and salt. Dhania powder helps to give thickness to the gravy. Mix well in low flame without burning them. Now add 1 cup of tamarind extract, raw pinched curry leaves. Let it boil for a minute. Add the grated jaggery, check for salt and spice. Add more chilli powder and salt if needed. Mix well and pressure cook in very low flame for 2 whistles.  Bitter gourd cooks soft.
    Kakarakaya pulusu
    Kakarakaya pulusu
  • Open the cooker and see a layer of oil floating on top. Check if the gravy is too watery. If  its too watery, boil for sometime till slightly thick. Mix well and serve hot with rice, papad ! ( Oil floats on top only if you cook this gravy in pressure cooker.  If you make in kadai, you should boil the gravy till oil oozes out.)
    Kakarakaya pulusu
Enjoy!
Note
  • Adjust the quantity of green chillies and red chilli powder as per your taste buds
  • Add the mentioned quantity of oil to get the oil floating on top.
Try this Andhra delicacy at home and enjoy your lunch !!
Kakarakaya pulusu recipe
Continue Reading...


September 15, 2016

Ulli Theeyal Recipe Kerala Style - Small Onion Theeyal /Shallot Curry

Ulli theeyal recipe Kerala
Ulli Theeyal is a Kerala special, gravy kind of side dish served for rice. Ulli means onion in Malayalam. Theeyal curry preparation is usually made with pearl onions (Shallot/Small onions) as the main ingredient. For variations, drumstick(Muringakka), Bittergourd(Pavakka) or ladies finger(Vendakka) can also be added along with onion. It is also served in Onam sadya. This gravy tastes similar to Tamilnadu Arachuvitta Puli kuzhambu.

 Traditional, authentic theeyal recipe calls for roasting coconut along with whole spices like coriander seeds, red chilli whereas I followed an easy and quick version from Marias menu. I have used Dhania powder and red chilli powder along with coconut.It came out really well and finger licking delicious.I am sure I will make this kuzhambu very often in my kitchen.Lets see how to make Kerala style Ulli theeyal recipe with step by step photos !

Check out other Kerala recipes too.

Ulli theeyal recipe Kerala

Ulli theeyal recipe - Kerala style Shallot curry for rice


Ulli theeyal recipe - Kerala style Shallot curry for rice Ulli theeyal recipe - Kerala special spicy, tangy gravy made with small onion/Shallots
Cuisine: Indian
Category: Side dish for rice
Serves: Serves 2-3
Prep time: 10 Minutes
Cook time: 20 Minutes
Total time: 30 Minutes


INGREDIENTS
1 cup - 240 ml
  • Small onions/ Shallots - 15 nos
  • Tamarind - Big gooseberry size
  • Salt & water - as needed
To saute in oil
  • Coconut oil - 2 tbsp
  • Grated coconut - 1/2 cup
  • Red chilli powder – 1.5 - 2 tsp
  • Dhania powder - 2 tsp
  • Turmeric powder - 1/4 tsp
To temper
  • Coconut oil – 1.5 tbsp
  • Mustard seeds - 1/2 tsp
  • Fenugreek seeds - 1/8 tsp
  • Curry leaves - few
  • Red chilli - 1 no ( pinched)
METHOD

  • Soak tamarind in 1 cup of water for 15 minutes and take the extract.Wash and peel the small onions. Slice it into two if its very big. Set aside.
  • In a big kadai, heat oil and roast the grated coconut along with 5 small onions.Roast till coconut starts to turn golden brown with a nice roasted smell. It takes nearly 10 minutes to do this. So stay nearby and roast it patiently with continuous stirring. Keep the flame medium. Finally add the turmeric powder, red chilli powder and dhania powder. Mix well for a minute till raw smell leaves and switch off the flame. Let it cool down completely. Then grind them to a paste.
    Ulli theeyal - Kerala style
    Ulli theeyal - Kerala style
  • Heat 1 tbsp of oil in a kadai. Splutter mustard seeds, fenugreek seeds, curry leaves. Saute the  small onions till transparent. To this, add tamarind extract and required salt. Boil the gravy till onions cook well. After the onion is cooked, add the ground coconut paste. Check for taste, add more red chilli powder & dhania powder if it tastes tangy. Boil well till the gravy thickens and leave oil.
    Ulli theeyal - Kerala style
    Ulli theeyal - Kerala style
  • Enjoy ! This gravy thickens  more in time. So adjust the consistency by adding some water and give a boil before serving. check for taste and add more salt or red chilli powder, dhania powder if needed. Boil and serve !
  • This gravy stays good for weeks stored in refrigerator ! Use clean spoon for every use.

Note
  • Add more chilli powder if you like spicy gravy.
  • This gravy tastes the best with small onions. so its better to use it. If you don’t have them in hand, you can use big onion but flavors may differ.
  • Add less tamarind if its more tangy.

Yummy, finger licking Kerala ulli theeyal is ready to serve ! I served with Chena Erissery, Nendran chips and rice !!
Ulli theeyal recipe
Continue Reading...


September 7, 2016

Kerala Sambar With Coconut - Varutharacha Sambar Recipe – Onam Sadya Sambar Recipe

Kerala Varutharacha sambar recipe
This is the first time I prepared authentic, Kerala style Varutharacha sambar with coconut. This sambar is prepared without readymade sambar powder (Thrissur recipe). People call this as Onam sadya sambar. I have already tried Kerala ulli sambar, pressure cooker sambar and Varutharacha sambar recipe without coconut for my onam sadya menu earlier. 

Yesterday I made this thenga aracha sambar for our lunch following this recipe. The smell of roasted spices along with coconut takes this sambar to the next level.  The nice aroma of this sambar while cooking will surely tempt you to have the food quickly.Its a must try sambar recipe for Onam festival. But it needs a resting time of at least 30 minutes for all its flavor to blend well. I have used drumstick/muringa, onion/ulli and ladies finger/vendakkai. For variations, you can also use carrot, potato and even bottle gourd ( Kumbalanga in Malayalam). This sambar can also be made using sambar powder and roasted coconut. I will share that version later.

The ingredients used in this recipe is very similar to our Tamilnadu style Arachuvitta sambar except the quantity of coconut. Recently I tasted Onam sadya lunch menu in Kumarakom restaurant in HSR layout. It was a simple ona sadya yet tasted delicious. I loved their sambar, moru curry and sambaram the most. This sambar tasted close to the one I had in restaurant. 

Friends, do try this Kerala type sambar recipe for your lunch. I am sure you will make it more often. Lets see how to make Kerala Varutharacha sambar recipe with step by step photos.

Varutharacha sambar recipe

Check out my
 

Kerala Varutharacha sambar recipe


Kerala Varutharacha sambar recipe Kerala Varutharacha sambar recipe - A must try sambar for Onam sadya!
Cuisine: Kerala
Category: Sambar varieties
Serves: Serves 4
Prep time: 10 Minutes
Cook time: 20 Minutes
Total time: 30 Minutes


INGREDIENTS
1 cup - 250ml
  • Toor dal - 1/3 cup
  • Turmeric powder - 1/4 tsp
  • Water - 2 cups
  • Cooking oil – few drops
  • Drumstick - 1 no
Tamarind – Small lemon size
To saute & grind
  • Coconut oil - 2 tsp
  • Chana dal - 1 tsp
  • Urad dal - 1 tsp
  • Dhania/Coriander seeds - 3 tsp
  • Methi seeds - 1/4 tsp
  • Red chillies – 4 -5 nos
  • Curry leaves - 5 leaves
  • Hing/Asafetida – 2 pinches
  • Grated coconut - 1/3 cup
  • Small onion - 2 nos or big onion - 1/4 no
To temper & saute
  • Coconut oil - 1 tbsp
  • Mustard seeds - 1/2 tsp
  • Urad dal - 1/2 tsp
  • Red chilli - 1 no
  • Curry leaves - few
  • Big onion or small onion - 1/ 10 nos
  • Tomato – 1 no ( Optional, I din’t use)
  • Ladies finger - 10 nos
  • Coriander leaves - to garnish
HOW TO MAKE KERALA STYLE VARUTHARACHA SAMBAR - METHOD

  • Soak tamarind in 1/2 cup warm water for 15 minutes and take the extract. In the mean time, pressure cook toor dal adding required water, turmeric powder and few drops of oil. Chop drumstick into finger size and keep it in a small bowl inside pressure cooker. Do not add water in drumstick. It will get cooked with the help of steam inside cooker. Cook for 2 whistles in low flame. Open the cooker and mash the dal well and set aside. Keep the cooked drumstick separately.
  • In a kadai, heat coconut oil and saute all the ingredients in medium flame given under “ To saute & grind”. Saute till you get nice aroma & color of coconut changes golden. Do not burn any of the ingredients. Let them cool down. Grind everything to a smooth paste adding required water. Set aside.

  • In the same kadai, heat coconut oil and splutter mustard seeds, urad dal, red chilli and curry leaves. Add chopped ladies finger and onion, saute till turns transparent. Add this to the cooked dal, tamarind extract, ground coconut paste and cooked drumstick pieces. Check for taste and add more salt if needed. Let the sambar roll boil for few minutes. Nice aroma wafts through.
  • Garnish with coriander leaves and give a boil. Switch off the flame and cover it with  a lid. Give a standing time of 30 minutes before serving. Enjoy mixing with plain rice. Add few drops of ghee while serving !

Note
  • You can also add chopped carrot, potato. Add them to the drumstick in a separate bowl and cook inside the cooker.
  • Adding tomato is optional. I din’t use it.
  • Add red chillies as per your taste.

Delicious Kerala sambar is ready to serve with rice. I served it along with Kerala parippu curry and beans mezhukkupuratti. It tasted yum !

Varutharacha sambar recipe kerala

Continue Reading...


June 8, 2016

Pavakkai Puli Kuzhambu – Chettinad Bitter Gourd Gravy

Pavakkai Puli kuzhambu
Pavakkai puli kuzhambu/ Pavakkai kara kuzhambu without coconut in Chettinad style. I try to include bitter gourd ( Pagarkai/Pavakkai in Tamil) in my lunch menu at least once in a week as it is good for diabetes and high in nutrition with lots of health benefits. I make Pavakkai Pitlai & bitter gourd curry/Poriyal very often. Then comes crispy bitter gourd fries and bitter gourd biryani.

 Recently I came across this Chettinad style Pagarkai Puli Kuzhambu recipe in Solai aachi’s blog. Its my favorite blog for Chettinad recipes. I loved the simplicity  & ease of the recipe and tried it for our lunch. Sendhil told this kuzhambu tastes better than Pavakkai Pitali ( I think he got bored of my usual pitlai).

 From then, I started making this easy, no grind, one pot bitter gourd gravy ( Pavakkai Kuzhambu in Tamil) without coconut very often in my kitchen. Its a very simple kuzhambu recipe that can be made quickly during busy week days or lazy weekends. I make this gravy for Sendhil’s lunch box. 

 My Father visited my place and stayed here for two weeks. My dad loves varieties of Kara kuzhambu recipes. My dad liked it very much. I am happy that I have got a delicious, healthy gravy with bitter gourd. Bachelors and working women can try this if you like bitter gourd. Lets see how to prepare this easy Chettinad style Pavakkai Puli kulambu recipe with step by step pictures.

Check out my other bitter gourd recipes

Bitter gourd Biryani

Bitter gourd Poriyal/stir fry

Crispy bitter gourd fry

Pavakkai Pitlai

Bitter gourd podi

Bitter gourd Rasam/ Uppu saaru

Andhra Kakrakaya Pulusu

Bitter gourd Puli kuzhambu

Pavakkai Puli Kuzhambu Recipe


Pavakkai Puli Kuzhambu Recipe Chettinad style tangy Bitter gourd gravy for rice.
Cuisine: South Indian
Category: Kuzhambu recipes
Serves: Serves 2-3
Prep time: 10 Minutes
Cook time: 15 Minutes
Total time: 25 Minutes


INGREDIENTS

  • Bitter gourd - 1 no (Medium sized)
  • Tamarind - A big gooseberry size
  • Sambar powder – 1 tbsp
  • Dhania powder – 1 tbsp
  • Turmeric powder - 1/4 tsp
  • Salt - as needed
  • Water - 1 cup
To temper & saute
  • Gingely oil - 2 tbsp
  • Mustard seeds - 1/2 tsp
  • Methi seeds - 1/4 tsp
  • Fennel seeds - 1/2 tsp
  • Urad dal - 1/2 tsp
  • Small onion - 10 nos or big onion - 1 no
  • Garlic cloves - 10 nos
  • Tomato – 1 no
  • Curry leaves - few
METHOD

  • Soak the tamarind in water for 10 minutes.In the mean time, wash and slice the bitter gourd into very thin rings by removing its seeds. Slicing thinly helps to remove its bitterness. Chop the tomato, peel the onion, garlic cloves.
Bitter gourd Puli kuzhambu
  • In a pressure cooker, heat oil and temper mustard seeds, methi seeds, urad dal, fennel seeds and chopped onion, garlic cloves, curry leaves. Saute till onion turns transparent. Add tomato pieces and saute until mushy. Add the bitter gourd slices, turmeric powder, salt and saute for few minutes till its color changes to dark green.
Bitter gourd Puli kuzhambu
  • Now add 1 cup of tamarind extract, sambar powder, dhania powder. Mix well and pressure cook the gravy for onw whistle in low flame. Open the lid after the steam is released. Mix well and boil for sometime if you feel the gravy is too watery. Sambar powder and dhania powder makes the gravy thick. So no need to add rice flour to this kuzhambu. 
Bitter gourd Puli kuzhambu
Enjoy mixing with plain rice adding a tsp of gingely oil !!

Note
Adjust the quantity of sambar powder and dhania powder as per your taste.
You can replace bitter gourd with drumstick or brinjal. But keep the drumstick/ brinjal in a separate bowl inside the cooker because it will become mushy when directly cooked in the gravy.
Do not add more water in the cooker. Gravy will become watery & thin. To rectify this, you can either boil the gravy till thick OR dilute 1 tsp rice flour in 2 tsp water. Add to gravy and boil for 3 minutes.
Add a tsp of gingely oil or ghee while serving !

Try this easy, yummy Pavakkai Puli kuzhambu for your lunch and enjoy with any kootu/ dal or just with a papad. We had with Andhra ridge gourd dal and kai murukku 

Pavakkai puli kuzhambu recipe
Continue Reading...