I must thank my reader friend Harini for requesting me to try Chennai Ganga sweets shop style coconut burfi with khoya ( Thengai burfi in Tamil, Nariyal Ki burfi in Hindi). When she told me, I had no clue about its taste and texture. Recently I bought that coconut burfi from Ganga sweets during my Chennai trip. When I tasted it, I found the barfi is made with coconut and khoya. I browsed for the recipe and tried it by watching Dr.Shalini’s YouTube video. Even though its my first attempt, I am quiet happy with the results.I won’t say it came out 100% close to the sweet shop ones but it tasted similar.
Usually South Indian coconut burfi is made by cooking freshly scraped coconut in sugar syrup of one string consistency. But this coconut burfi with khoya is prepared by cooking khoya/mawa, desiccated coconut, sugar and water together till it reaches the burfi consistency. You don’t have to check for one string sugar syrup. But this burfi takes long time to cook and set as it has khoya in it.
I have not used milk, milk powder or condensed milk in this recipe as I had used yellow food color to resemble the sweet shop burfi. If you want to make white colored coconut burfi, use milk instead of water. I am happy that I could try this North Indian style nariyal ki burfi successfully at home. I am sharing this colorful recipe as my contribution for Holi festival. Do try this easy and yummy coconut mawa burfi at home for this festival and have a great celebration. Lets see how to make coconut khoya burfi with step by step photos and a VIDEO !
Do check out my Holi special recipes COLLECTION for more sweets and snacks ideas!
Coconut khoya burfi recipe - Nariyal Ki barfi with mawa
How to make coconut khoya burfi recipe at home - North Indian style coconut burfi with khoya !
Desiccated coconut - 1.5 cups ( I used store bought dry coconut)
Unsweetened Khoya / Mawa - 1 cup ( I used 200gms of Milky mist khoya)
Sugar - 1 cup
Water - 3/4 cup
Saffron threads - Few
Yellow food color - A pinch
Cardamom powder - 1/4 tsp
Chopped pistachios – 2 tbsp ( To garnish)
Ghee – 1 tsp ( to grease the plate)
METHOD
Grease a tray with ghee and keep it ready. Mash the khoya well and measure 1 cup. Keep aside.In a kadai, take 3/4 cup of water, add saffron threads, food color and cardamom powder. Mix well and let it start to boil. Add 1 cup of mashed khoya and mix well without lumps. It resembles condensed milk after mixing.
When it starts to boil with bubbles, add sugar and mix well.Sugar melts and the mixture starts to roll boil. Let it boil for a minute.
Then add 1.5 cups of desiccated coconut and mix well. Mixture will start to thicken. Keep mixing till the burfi mixture is thick and leaves the sides of pan completely. It becomes a whole mass with nice coconut smell. Stay nearby and keep stirring to prevent burnt bottom. It takes nearly 10–15 minutes to reach the final stage if mixing in medium to high flame. Make sure there is very less moisture. It should not be too wet. Remember over mixing makes the burfi too hard and chewy.So remove it at the right time.
Grease the bottom of a small bowl with ghee. Put the burfi mixture to the greased tray and press it well with a greased bowl. Level it and sprinkle the chopped pista pieces. Press it well.
Freeze the burfi mixture for one hour OR refrigerate it for 2-3 hours. It helps to set the burfi quickly and make shapes perfectly. Mark square shape using a greased knife.As the burfi mixture is cold and frozen, it would be difficult to handle. So press it hard to mark shapes. Remove it after few minutes. It tastes slightly chewy when consumed on the same day. Tastes perfect the next day. This burfi needs a setting time of 8 hours. Be patient. Leave over night and taste it the next day to know its actual taste.
Enjoy ! This burfi stays good for 2 days in room temperature and 4 – 5 days under refrigeration.
Note
If you want to use fresh coconut, you can use instead of desiccated coconut. But it takes longer time to cook and reach the final stage as fresh coconut has some water content.
Shelf life of the sweet reduces if you use fresh coconut.
Try this easy, yummy coconut khoya burfi at home and enjoy the festival !
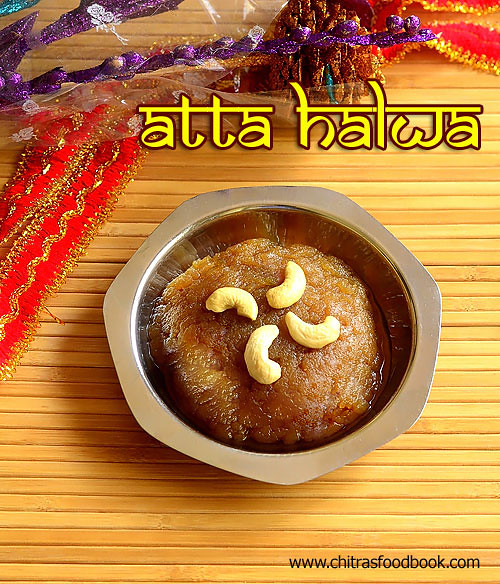
Atta halwa also known as Atta ka sheera is one of the most popular sweet/ dessert recipe in North India. This is an Instant halwa made with whole wheat flour( atta in Hindi). This atte ka halwa is served as Kadah prasad ( Karah prashad) to all the visitors of Gurudwara ( A place of worship for Sikhs ) in Punjab.
Traditionally, it is prepared with equal quantity of Whole wheat flour, Sugar and Butter/ghee to emphasize everyone are equal. Some people make this halwa adding equal quantity of wheat flour and sooji. For variations, this halwa can be made with milk or jaggery instead of sugar. I never thought making this North Indian style wheat flour halwa is so easy.
South Indian style Godhumai halwa/wheat flour halwa ( Tirunelveli halwa) is in no way related to this atta halwa in preparation and cooking procedure. Both has its own variations and taste. This sweet can be prepared easily and instantly for surprise guest and to celebrate special occasions at home. I am sure this ghee dripping halwa gets a big applause from your family members and friends. I followed the recipe from HERE and watched some You tube video recipes too.
Even though its my first attempt, making this halwa was a breeze for me. You can easily find the correct stage of removing the halwa. Its 100% a beginners recipe. This halwa tastes very soft and it slides in your mouth. I made in very less quantity just to serve 2 people as the quantity of ghee is more . Holi festival is fast approaching. Include this easy, rich atta ka halwa in your menu and enjoy the festival ! This atta halwa can also be prepared for babies but its made without ghee. I will share that recipe later.
Now lets see how to make Instant, easy wheat flour halwa/ atta halwa with step by step pictures and a video !
Whole wheat flour - 1/4 cup ( I used Aashirvad atta)
Sugar - 1/4 cup ( I used 1/4 cup heaped, add 1/2 cup for more sweetness)
Melted Ghee - 1/4 cup
Water - 1/2 cup
Cardamom powder - a pinch ( Optional, Its not used traditionally)
Cashews & sliced almonds - To garnish
HOW TO MAKE INSTANT WHEAT FLOUR HALWA - METHOD
Heat 1/4 cup of ghee in a wide, non-sticky kadai. Add wheat flour and roast till it turns golden brown in color with nice aroma. Keep the flame low to medium while roasting and keep mixing to prevent burnt bottom. It takes 3- 5 minutes to roast well based on the quantity you use.
Boil 1/2 cup of water in a bowl and add the hot water carefully to the roasted wheat flour. It splashes. Add 1/4 cup (heaped) sugar, cardamom powder ( I din’t use) and mix well without any lumps. All the water would be absorbed by the wheat flour and gets cooked.
Mix well till halwa leaves the sides completely, becomes a whole mass. Do not switch off the stove. Keep mixing till ghee starts to ooze out in the sides of kadai. It will turn glossy too. Do the whole procedure in medium flame. It takes just 3-5 minutes to release the ghee. Switch off the flame and remove in a plate or bowl. Serve warm or cold as you wish. Please watch the video for clear understanding !
For variations, you can add milk instead of water. You can also use grated jaggery in place of sugar. Enjoy !
Note
Traditionally this halwa is prepared with equal quantity of wheat flour, sugar and ghee. But I used little more sugar ( 1.25 cups) as we are sweet toothed.
If you don’t want to use equal quantity of ghee, you can use half the quantity mentioned. But texture may slightly vary.
Cardamom powder is not used in the traditional atta halwa. If you wish, u can add it along with sugar.
If you feel the sweetness is less, you can add it even at the end. Heat the halwa till the sugar melts and ghee oozes out. Serve it warm.
I read people have this halwa as a side dish for pooritoo just like suji ka halwa.
Try and enjoy this easy, yummy, rich wheat flour halwa at home !
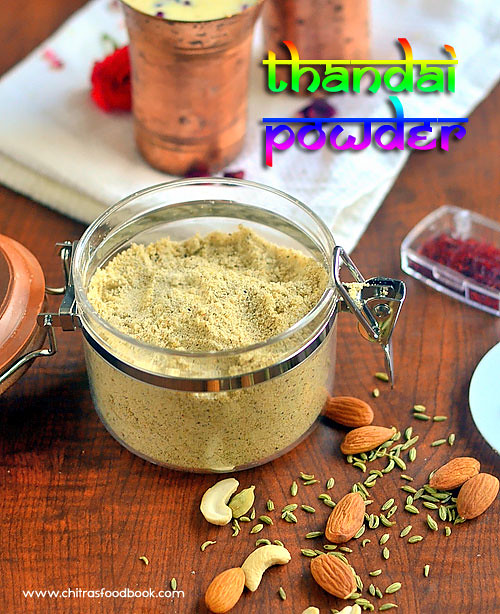
Thandai is a very popular drink in North India that is mainly served during Holi festival and Maha Shivratri. This drink is the best coolant for body with lots of health benefits as it is prepared with the combination of nuts, whole spices and milk. Yesterday my neighbor called me to enquire whether we get readymade thandai masala powder or thandai syrup at shops nearby my house. I browsed for some good brands and told her to get Patanjali or Haldirams Thandai powder as these are the well known names to me. She searched in shops but couldn’t get it. So I thought of preparing homemade thandai masala powder and share with her.
As I had already shared the recipe of thandai from scratch, I know making at home is very easy. I used to make it regularly for every Maha Shivaratri festival along with our South Indian style arisi vella puttu and offer to Lord Shiva. This year I was planning to make the same following my recipe. But now after my neighbor’s suggestion, I wanted to make and store this homemade thandai masala in advance and prepare it quickly on Shivrathri day. I watched some You tube video recipes and adapted this recipe.
I have also watched a video from BBD TV’s travel escapades in which the preparation of thandai with & without bhang from a popular shop in Ujjain was shown.I found it very useful. For this thandai powder recipe, I could see many variations across the web.Some recipes are very simple with just 4 ingredients and some recipes are with bhang as well. But in this recipe, I have not used Bhang. Basically bhang balls are made from hemp seeds and leaves which are washed, cleaned and grinded to a smooth paste. But it should be used in minimum quantity as over dosage induces psychosis, excitement, uncooperativeness and hallucinations.
This is a very simple thandai masala that can be prepared with easily available ingredients. I have used Khus Khus in this recipe. I know its banned in some of the countries. In that case, feel free to skip it.Yesterday I made thandai using this powder and it came out very well. It was refreshing and we loved it a lot. I have passed some of this powder to my neighbor. I hope her family will like it too. Ok, lets see how to make Thandai masala powder at home with step by step pictures.
Dried Rose petals - 1 tbsp or 15 nos OR rose essence - 1 tsp
Pista – 1 tbsp (Optional , I used it)
To make thandai ( For one serving)
Boiled milk – 1 cup ( At room temperature, use full fat milk)
Thandai powder – 1 tbsp ( Adjust)
Ice cubes – few ( 2 nos)
HOW TO MAKE THANDAI POWDER - METHOD
Take all the ingredients for thandai masala and keep it ready. Grind them to a fine powder using a mixie. Sieve it and again grind the coarse ones. Use the remaining leftovers for making fresh thandai or lassi. Mix the powder well with a spoon and store in a box. Thandai masala powder is ready !
This powder can be stored for 2 months in an air tight box. Use clean spoon to handle.
To make Thandai : Boil thick, full cream milk and let it cool down to room temperature. In a wide bowl, put few ice cubes, add 2 cups of milk and 1 tbsp ( i.e 5-6 tsp) thandai powder. Mix well. Check for taste and add more sugar or thandai powder if needed.
Strain it using a cloth strainer( Tea strainer) and serve it. If you want to serve later, refrigerate it till use. It tastes the best only when served chilled. The more the standing time, the more tasty it would be!
Straining is more important.Do not forget to strain the milk after adding thandai powder.
Enjoy !
Note
There is no hard and fast rule in the quantity of ingredients for masala. You can reduce or increase it as per your like.
I felt pistachios are not needed as it was not mentioned in the Ujjain video.Still I had used just 1/2 tbsp of it. Do not add more. It would dominate the other ingredients in flavor.
Do not add more pepper corns. The color of thandai is usually sandal in color if its made without bhang. It looks green when bhang is added.
Adjust the amount of cardamom and fennel as they are the flavoring ingredients for thandai.
Straining is more important. Do not forget to strain the milk after adding thandai powder.
Try this Thandai powder at home and enjoy this refreshing drink instantly at your will !
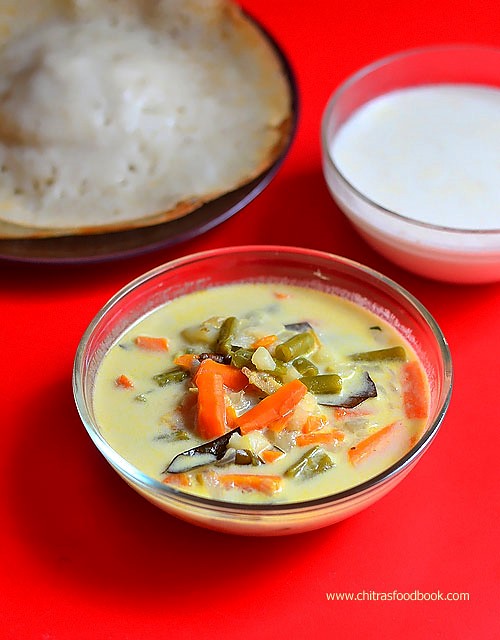
Vegetable stew also known as Ishtu is one of the most popular side dish recipes served for Appam and Idiyappam/Noolappam in Kerala. I make appam at least twice in a month for breakfast as it is our family favorite. Usually I make mixed vegetable stew, potato kurma/ payaor onion chutney as side dish for appam. I learnt this stew recipe after watching a cookery show by a Chef in Raj TV. He addressed this recipe as “Restaurant style Vegetable Stew”. I got attracted by the title and wrote down the recipe in my cook book. Its a very simple & healthy vegetable stew recipe that looks colorful with awesome flavor and rich taste of mixed vegetables, coconut oil & coconut milk. I made this stew in pressure cooker to make my job easier.So its color was pale white but it tasted great. We loved it a lot with appam.This veg stew post was lying in my drafts for long time.So I thought of bringing out today. Friends, do try this easy, Kerala style vegetable stew recipe at home & relish it with appam or idiyappam for your breakfast. For variations, you can use potato instead of mixed veggies and make it as potato stew. Ok lets see how to make vegetable stew with step by step photos !
Check out my other “Kerala Recipes” too!
Grate or chop 1 coconut into pieces. Grind to a smooth paste adding 1 cup of water. Strain the thick coconut milk and keep it in a bowl. Again grind the coconut adding 1 cup of water.Take the second milk by extracting it. Keep in another bowl.
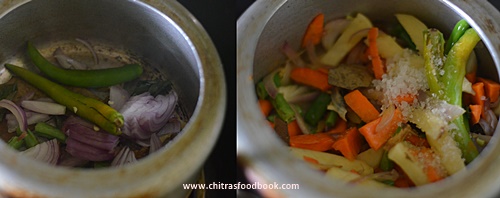
Wash and chop the vegetables of 1 inch length. Slit the green chilli, slice the onion.Chop the ginger into small pieces or slice it thinly.
Heat coconut oil in a pressure cooker base. Saute bay leaf, cinnamon, cloves. Add thinly sliced onion, ginger pieces and slit green chilli. Saute till onion turns transparent. Make sure color of onion stays white and not brown.
Then add the chopped mixed vegetables, a big pinch of sugar and saute for a minute. Sugar helps to retain the color of vegetables.Add the required salt and the second coconut milk.Mix well and close the cooker. Cook for one whistle in very low flame. It takes 7-8 minutes.Open the cooker after the steam is released.Veggies would be cooked soft.
Now add the thick coconut milk now and give one boil.Check for taste, add more salt if needed. Switch off the flame. Garnish with curry leaves and set aside. Give a standing time of 15 minutes and serve with appam/idiyappam.
Enjoy !
Note
Add more green chilli for spicy taste.
Add cashew paste for thickness and richness to the stew. Grind 6 cashews and add the paste.
This stew has a mild masala flavor.
Coconut oil is very important for tempering. Do not skip it.
Try this Kerala style vegetable stew with appam and enjoy !!
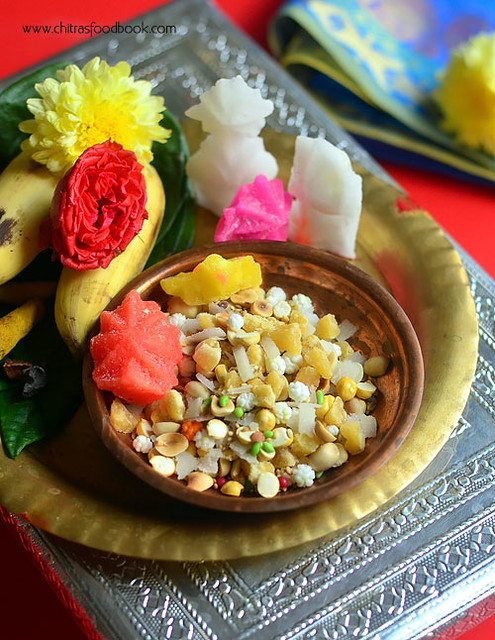
Ellu Bella (Sesame seeds-Jaggery trail mix in English) is one of the most popular Makar Sankranti recipes in Karnataka.This is basically a mix of 5 main ingredients – Sesame seeds, Jaggery, Dried coconut pieces, Roasted Peanuts and Fried Gram dal.During Sankranti festival, this mix sold in small packets in all the shops.This ellu bella mix is exchanged with friends & relatives to celebrate this harvest festival and as a token of love for better bonding of relationship. In Kannada, they call this as Ellu beerodu in which they give a pack of ellu bella mix, betel leaves & nuts, fruits ( preferably banana), Sugar moulds ( Sakkare achu) and sugar cane to the near & dear. I have seen my friends ( School moms group) preparing this ellu bella mix 2-3 days before Sankranti and distribute to all. Being in Karnataka for the past ten years, I wanted to share their traditional sankranti recipes in my blog. So I asked my friend Archana to share the recipe and the method of making ellu bella.She explained patiently and clarified all my doubts on how to cut jaggery & coconut into small pieces etc. Thank you so much Archu. Some people add equal measure of all the ingredients whereas some use according to their preferences. I have just followed my friend’s recipe. I prepared ellu bella for the first time in my house successfully and distributed to Raksha’s friends as well. They all loved it very much.Next year I must try homemade sakkare achu. Now lets see how to make Ellu bella recipe at home with step by step pictures !
Check out my other Karnataka recipes too!
Take the whole dried coconut. Grate it using a grater to remove the skin. Slice it using a chips slicer to make thin slices.Chop into very small pieces using a sharp knife. Spread in a plate.
Take the jaggery and cut into small blocks using a knife.Then cut them into very small pieces using scissors or nut cracker tool. I used scissors ( Achu vellam/Achu bella works the best. But I used round ones).Spread the jaggery pieces in the plate.
Microwave peanuts in high power for 2-3 minutes.Remove in a cover or cloth and rub it well to remove the skin. Break them into 2 and keep aside.
Sun dry the coconut & jaggery pieces for 2 – 4 hours OR Dry roast the coconut pieces without changing the color. Warm the jaggery pieces without melting.Sun drying is the best option though. Dry roast sesame seeds till it crackles. Set aside to cool.
In a wide bowl, take the roasted, broken peanuts, fried gram dal, sugar balls, jeera mittai, dried coconut pieces and jaggery pieces. Mix well and store in a box. Distribute to your Family & Friends !
Enjoy !
Try this easy,traditional Karnataka special ellu bella mix at home and have a great celebration !
Distribute ellu bella with a pair of banana, betel leaves & nuts, sakkare achu & sugarcane piece as shown below ( sugar cane is missing in the pic )


 How to make coconut khoya burfi recipe at home - North Indian style coconut burfi with khoya !


 . Some people add equal measure of all the ingredients whereas some use according to their preferences. I have just followed my friend’s recipe. I prepared ellu bella for the first time in my house successfully and distributed to Raksha’s friends as well. They all loved it very much.Next year I must try homemade sakkare achu. Now lets see how to make Ellu bella recipe at home with step by step pictures !


 )
)