Search Chitra's Food Book

October 27, 2017

Kambu Idli Dosai – Bajra Idli Dosa - Pearl Millet Idli Dosa Recipe

Pearl millet idli, dosa recipe without rice ( Kambu idli dosai in Tamil, Bajra Idli dosa in Hindi, Sajjalu Idli dosa in Telugu, Sajje idli dosa in Kannada, Kambam Idli in Malayalam) with step by step pictures and video. After a long time, I am happy to share a millet recipe in my website.I love to consume millets in the form of idli, dosa, adai or upma at least once in week either for breakfast or dinner. But I haven’t blogged many of the recipes I make in my kitchen. So I thought of sharing them one by one from this week.
KAMBU IDLI RECIPE
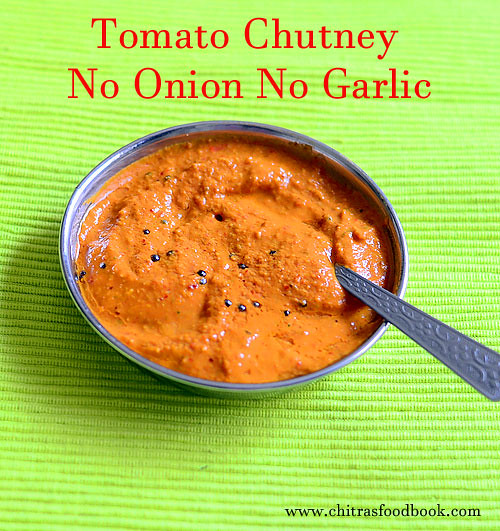
This is not going to be a millet series. I will try to post the Indian style millet recipes whenever I can. To begin with here is a healthy, super soft pearl millet idli without using rice. Pearl millet is one of the wonder grain millets that helps to control diabetes, reduces cholesterol and aids for weight loss. I adapted my Mixie idli,dosa batter recipe and prepared this idli using bajra/kambu. We can grind this kambu idli batter easily using Indian mixie. It came out very well and I am completely satisfied with the results. I made soft idli on the first day with the fermented batter and crispy dosa for the next day dinner. Both were good in taste when consumed hot. But idli looks grey in color and smells like millet as it has no rice. Tomato chutney or coconut chutney is a good side dish for this Kambu idli and dosai. Do try this healthy bajra idli at home and share your feedback with me. Ok, lets check how to make Kambu idli/ Pearl millet idli with step by step pictures and video !

Do check out my other MILLET RECIPES too.


Pearl millet idli

Kambu idli dosai recipe - Bajra idli / Pearl millet idli dosa recipe


Kambu idli dosai recipe - Bajra idli / Pearl millet idli dosa recipe

Healthy Pearl millet idli and dosa recipe without using rice


Cuisine: Indian
Category: Millet recipes
Serves: 20 nos
Prep time: 5 Minutes
Cook time: 10 Minutes
Total time: 15 Minutes


INGREDIENTS

1 cup - 240ml
  • Pearl millet / Kambu / Bajra - 2 cups
  • White,round urad dal - 1/2 cup
  • Poha / Aval / rice flakes - 1/4 cup ( I used thick poha)
  • Methi seeds / Fenugreek seeds - 1/2 tsp (Optional)
  • Salt & Water - As needed

HOW TO MAKE PEARL MILLET IDLI

  1. Wash and soak pearl millet, methi seeds and poha together for 5 hours.
  2. Wash and soak urad dal separately in another bowl for 2 hours.
  3. Grind urad dal to a smooth paste adding the soaked water.
  4. Collect in a bowl and then grind millet + Poha mixture to a smooth paste adding enough water.
  5. Mix both the batter with hands and let it ferment overnight. The next day, mix the batter well and make idli.
  6. Enjoy with tomato chutney or coconut chutney !


METHOD - STEP BY STEP PICTURES

  • Wash the pearl millet twice to remove the debris , add poha, methi seeds, wash again and soak it in enough water for 5 to 6 hours. Wash and soak urad dal separately in another bowl for 2 hours.
    Kambu idli
  • First grind urad dal in a mixie to a thick, smooth batter adding enough water. I used the soaked water for grinding. You can also use ice cold water. Then grind the soaked pearl millet + Poha to a smooth batter adding required water. Do not make the batter watery.

  • Mix both the batter well with your hands and allow it to ferment overnight or 12 hours based on the weather in your place. The next morning, batter would have raised well. Its consistency should be like regular idli batter.
    Kambu idli
  • Mix well and make idli in a greased idli plate. Steam it for 10 to 15 minutes. Remove after it becomes warm. It tastes super soft when hot with the flavor of pearl millet. Serve hot to enjoy its best taste !
    Kambu idli
    Kambu idli

    Enjoy !

Note

  • Do not grind the batter too watery. Add only the required water.
  • Urad dal should be soaked and grind separately to get soft idli.
  • If you soak them together, you need to add more urad dal and poha. You may have to use 3:1 ratio of millet and dal if soaking them together.
  • You can also use Kuthiravali/ barnyard millet or Thinai/Foxtail millet instead of pearl millet.
Try this healthy Kambu idli & dosai with your favorite chutney or sambar !
Kambu dosai
Continue Reading...


October 24, 2017

Tomato Chutney Recipe Without Onion,Garlic,Coconut–No Onion No Garlic Chutney

 Tomato chutney without onion
Tomato Chutney Recipe without onion, garlic and coconut with step by step pictures and video. I have posted varieties of tomato chutney recipes (Thakkali chutney in Tamil) in my website but not even one tomato chutney without onion and garlic. 

This morning, I prepared Kambu idli, dosa (Pearl millet idli / Bajra idli) for our breakfast and prepared this South Indian style tomato chutney recipe without adding onion, garlic and coconut.

 This recipe is very similar to my tomato chana dal chutney but I have used urad dal, coriander seeds as well. It tasted yummy when drizzled with sesame oil. I have already shared an easy tomato thokku recipe without onion and garlic but I never thought to try a chutney recipe.

 I am happy that I tried this no onion no garlic tomato chutney recipe. I am sure this chutney would help people looking for No onion no garlic recipes during festival season or under fasting. Its a good side dish for idli and dosa. Hope you will try this recipe and like it.

 Ok, lets see how to make tomato chutney recipe without onion, garlic and coconut.

Do check out my 50 chutney recipes if interested.


Tomato chutney - No onion no garlic

Tomato chutney without onion, garlic and coconut


Tomato chutney without onion, garlic and coconut

Thakkali chutney / Tomato chutney recipe without onion, garlic and coconut


Cuisine: South Indian
Category: Chutney Recipes
Serves: Serves 3
Prep time: 5 Minutes
Cook time: 10 Minutes
Total time: 15 Minutes


INGREDIENTS

To saute in oil
  • Ripe tomato - 2 nos (Medium sized)
  • Urad dal - 1.5 tsp
  • Chana dal - 1.5 tsp
  • Coriander seeds/Dhania - 1/2 tsp
  • Red chilli - 4 nos ( I used 2 Kashmiri chillies, 2 long chillies)
  • Curry leaves – 5 leaves
  • Hing /Asafetida – 2 pinches
  • Tamarind - A pinch
  • Cooking oil - 1.5 tbsp
  • Salt & Water – as needed
To Temper
  • Cooking oil - 1 tsp
  • Mustard seeds - 1/2 tsp
  • Urad dal - 1/2 tsp

HOW TO MAKE TOMATO CHUTNEY WITHOUT ONION GARLIC 

  1. Wash and chop tomato into small pieces, set aside.
  2. Heat oil in a kadai and roast the dals, hing, dhania and chilli.
  3. Add tomato, salt,tamarind, curry leaves. Saute till mushy.
  4. Grind to a smooth chutney and temper with mustard, urad dal.

METHOD - STEP BY STEP PICTURES

  • Wash and chop tomato into small pieces, set aside. Heat 1.5 tbsp oil in a kadai and roast the urad dal. chana dal, dhania, hing and red chillies. Saute till dals turn golden.
    Tomato chutney without onion and garlic
  • Add chopped tomato, pinch of tamarind, hing, salt and curry leaves. Saute till tomato becomes mushy.
    Tomato chutney without onion and garlic
  • Let the mixture cool down. Then grind to a smooth paste adding required water. Transfer to a bowl.
    Tomato chutney without onion and garlic
  • Heat 1 tsp oil in a small kadai, temper mustard seeds, urad dal. Add to the chutney, mix well and serve with idli, dosa !

  • Enjoy !

Note

  • I have used 2 Kashmiri chillies/Byadgi chilli for bright red color and 2 long chillies for spiciness.
  • You can replace Kashmiri chillies with one or two spicy chilli if you like.
  • Addition of Coriander seeds is optional but it gives a  nice flavor. Do not add more than the mentioned quantity.
  • Curry leaves is also for flavor. You can skip if you don’t like it. You can use 1 tbsp of coriander leaves instead.
  • Do not add more curry leaves. Chutney smells raw.
  • As this chutney is without onion and garlic, tempering is a must to enhance its flavor. So don’t skip it.

Try this easy, yummy, no onion no garlic tomato chutney for idli & dosa. You will love it !
No onion no garlic tomato chutney
Continue Reading...


October 23, 2017

Green Peas Kurma For Chapathi, Poori – Pachai Pattani Kurma Recipe

Peas kurma for chapathi 
Peas kurma recipe / Green peas kurma (Pachai Pattani kurma in Tamil) for chapathi, poori, idli and dosa. I love to try varieties of South Indian kurma recipes at home. Recently I prepared this green peas kurma as a side dish for chapathi. I adapted this recipe from Jeyashri’s kitchen and made few changes as per my taste. It came out really well. I used dry peas in this recipe. You can also make this yummy peas gravy with fresh,frozen peas. We relished it with chapathi and had the same kurma with idli,dosa the next day. Myself & Raksha liked this combination very much. 

Basically I love to have kurma type of side dish for idli & dosa. My mom makes varieties of kuruma kulambu for idli,dosa. This pattani kurma is one of its kind. I am happy that I got an easy, yummy green peas kurma that goes well not only for chapathi, poori but also for idli,dosa. I hope this kurma tastes well with mild pulao and rice varieties too. For variations, you can also add boiled potato along with peas. 

Do try this delicious Pattani kurma for chapathi and share your feedback with me.  Ok, lets see how to make peas kurma with step by step pictures.

Check out my potato kurma for poori and Saravana bhavan style veg kurma recipes too !

Pattani kurma

Green Peas kurma recipe / Pattani kurma


Peas kurma recipe / Pattani kurma

Peas kurma recipe - A delicious South Indian gravy for chapathi, poori, idli and dosa !


Cuisine: Indian
Category: Side dish for chapathi
Serves: 3
Prep time: 10 Minutes
Cook time: 20 Minutes
Total time: 30 Minutes


INGREDIENTS

1 cup - 250ml
  • Dry peas or fresh green peas - 1 cup ( You can use frozen green peas too)
  • Tomato - 2 nos
  • Big onion - 1 no
  • Ginger-Garlic paste - 1 tsp
  • Fennel seeds - 1/2 tsp
  • Turmeric powder - 1/4 tsp
  • Red chilli powder - 1 tsp
  • Dhania powder – 1 tsp
  • Garam masala powder - 1/2 tsp
  • Cashew nuts - 5 nos
  • Grated coconut - 2 tbsp
  • Salt & water - as needed
  • Cooking oil – 2 tbsp + 1 tbsp
  • Coriander leaves - to garnish (Optional)

HOW TO MAKE GREEN PEAS KURMA

  1. Wash and soak dry peas overnight or 8 hours.
  2. Pressure cook in low flame for 2 whistles.
  3. Saute onion, tomato, g&g paste and spice powders.Grind to paste adding coconut.
  4. Saute this ground paste in oil and add the cooked peas.
  5. Boil till oil floats on top. Serve with poori, chapathi, idli & dosa.

METHOD - STEP BY STEP PICTURES

  • Wash and soak dry peas in enough water overnight or for 8 hours. Pressure cook in low flame for 2 whistles adding 1 cup of water and salt. Alternately you can use fresh green peas or frozen peas. No need to pressure cook if using fresh peas/ Pachai pattani.
    Peas kurma recipe
  • Heat cooking oil and saute onion, fennel seeds, tomato, gg paste, turmeric powder, red chilli powder, Dhania powder and garam masala powder.
    Peas kurma recipe
  • Lastly add coconut, cashew nuts and saute for a minute.Grind to a smooth paste adding required water.
    Peas kurma recipe
  • Heat oil in a kadai and when it gets heated , add the ground paste. Add salt, sugar and saute till thick. If using fresh peas or frozen peas, add at this stage and boil till it cooks well.  Add cooked peas, 1 cup of water and boil for 5 minutes till nice aroma arises.
    Peas kurma recipe
  • Adjust the consistency of the gravy by adding more water if needed. This gravy thickens quickly when it cools down.So add more water, check for salt and serve with poori, chapathi, idli and dosa.
    Peas kurma recipe
  • Enjoy !

Note

  • For variations, you can skip garam masala powder and try it. But I would recommend to use it.  
  • You can also add boiled potato cubes if you have less peas in hand.
  • You can grind the masala ingredients without sauting in oil but it gives a different flavor and taste to this kurma.
  • Adjust the consistency of this kurma as you like.I like mine to be semi solid in consistency as you see in the picture below.  
  • If using fresh peas or frozen peas, you can add it along with ground paste. No need of pre cooking.

Try this easy, yummy Peas kurma and enjoy with poori,chapathi, idli or dosa !
Peas kurma recipe

Continue Reading...


October 20, 2017

Rasam Powder Recipe – Tamilnadu Style Homemade Rasam Podi

Rasam powder Tamilnadu
Tamil nadu style rasam powder / rasam podi recipe with step by step pictures and video. This is one of the best rasam powder I have ever made at home. I am a not a regular buyer of store bought rasam podi. But my friends used to buy Sakthi masala rasam powder, aachi rasam powder and MTR rasam powder. They say everything tastes good in its own way.  But I love to grind homemade rasam powder with fresh ingredients & make rasam with it  

I have already posted my Tirunelveli aachi’s rasam powder recipe for small quantity in my South Indian rasam recipe post. It smells and tastes awesome. I have also shared my Dad’s style rasam recipe using a 2 ingredient, instant rasam powder and easy bachelors style rasam. But some of my readers who tried my homemade sambar powder asked me to share authentic, traditional, Tamil people style homemade rasam powder recipe to grind & store for one month use.

When I told this to my MIL, she immediately suggested a recipe she read long back in a magazine. She made a trial batch and passed it to me. I loved its flavor and taste. Last month when my MIL came to Bangalore, I told her to make this rasam podi & idli podi and took video for my reference. 

The quantity I have mentioned in this recipe comes for 1 month use if you prepare rasam regularly. Its flavor and spiciness remains the same if stored in an airtight box. You can grind it easily at home using your Indian mixer. Use it within a month to enjoy its best taste & flavor. Ok, lets see how to make Tamil nadu style homemade rasam powder recipe !

Rasam powder ingredients

Rasam Powder Recipe - Tamil nadu Style Rasam Podi


Rasam Powder Recipe - Tamil nadu Style Rasam Podi

Tamil nadu style, homemade rasam powder recipe with easily available ingredients


Cuisine: South Indian
Category: Rasam Recipe
Serves: 1 cup
Prep time: 5 Minutes
Cook time: 10 Minutes
Total time: 15 Minutes


INGREDIENTS

1 cup - 250ml
  • Dhania / Coriander seeds - 1/2 cup
  • Pepper - 1/4 cup
  • Cumin seeds / Jeera - 2 tbsp
  • Toor Dal - 2 tbsp
  • Chana dal - 2 tbsp
  • Methi seeds - 3/4 tbsp
  • Red chilli - 25 to 30 nos
  • Curry leaves - fistful
  • Turmeric powder – 1/2 tbsp

HOW TO MAKE RASAM POWDER

  1. Measure & Take all the ingredients required for rasam powder.
  2. Sun dry or dry roast one by one.
  3. Cool & Grind to coarse powder.
  4. Store for a month & make rasam with it.

RASAM POWDER RECIPE - STEP BY STEP PICTURES

Measure all the ingredients given for rasam powder. Sun dry them for one day till it gets heated. Then grind to a coarse powder and store for months.
Alternatively you can dry roast all the ingredients one by one carefully without burning them
Heat a kadai and dry roast coriander seeds till it gives nice aroma.Remove in a plate.
Then roast the methi seeds and roast till golden brown.Remove in the plate.
rasam powder recipe
Dry roast cumin seeds and then pepper corns till its heated.
rasam powder recipe
Now roast toor dal and chana dal till it gets heated. Collect them in the plate. Then roast the red chillies in medium flame till it becomes crispy, keep it in a separate plate.

rasam powder recipe
Lastly roast the curry leaves. Switch off the flame and let it be in the hot kadai till it turns crispy. Transfer it to the red chilli plate.

rasam powder recipe
After it cools down, transfer to a mixie jar. Add turmeric powder and grind everything to a slightly coarse powder.  Grinding coarsely helps to retain the flavor for long time. But do not grind it too coarse. Store in an air tight box once the powder cools down completely.

rasam powder recipe
You can add 1 tbsp of this rasam powder for making rasam for 3 people.
This rasam powder stays good for 1 to 2 months. Use a clean spoon for handling.

Note

  • I have used more red chillies which helps to retain the flavor and spiciness for more days. If you reduce the quantity of chillies, powder will become bland in taste after few days. 
  • You can skip curry leaves if you don’t like. Instead you can add some fresh curry leaves while making rasam. 
  • Toor dal and chana dal helps to give some thickness to the rasam. So adding cooked dal water is optional. 
  • Use fresh ingredients and grind it whenever needed.

Try this yummy, flavorful homemade rasam powder and make rasam with it. You will love its taste !
Rasam podi
Continue Reading...


October 17, 2017

Cornflakes Mixture Without Oil – Kellogg's Corn Flakes Mixture / Chivda

Cornflakes mixture using Kellogg’s corn flakes. It is made without deep frying in oil. Recently my daughter Raksha tasted this cornflakes chivda in her friend’s house. She told me to try it for Diwali. I asked her friend’s mom for the recipe and tried it today. Its a very easy, quick and healthy snack as it has very less oil. Kids & adults would love this for sure.Its quiet additive !
Kellogg's cornflakes mixture
Many of us buy corn flakes cereals (Kelloggs or Kwality brand) for breakfast. If you have it in hand, you can make this corn flakes mixture in the next 10 minutes. You can pack this for your kids snack box or for their teatime after coming back from school. It can be stored for 2 to 3 days without losing its crispness. Friends, diwali is incomplete without mixture recipe. If you have not done any mixture recipe, you can try it now. Try this easy, low calorie Kellog’s corn flakes mixture at home and surprise your family.Check out the video recipe below.

Cornflakes mixture recipe without oil

Cornflakes mixture


Cornflakes mixture Low calorie cornflakes mixture recipe using Kellogg's Cornflakes with less oil!
Cuisine: Indian
Category: Snacks
Serves: 4.5 cups
Prep time: 5 Minutes
Cook time: 5 Minutes
Total time: 10 Minutes


INGREDIENTS

  • Kellogg's corn flakes - 2 cups (Original, plain flavor)
  • Roasted peanuts – 2 tbsp
  • Curry leaves - few
  • Cashew nuts - 2 tbsp (broken, optional)

To temper
  • Cooking oil - 1 tbsp
  • Mustard seeds - 1/2 tsp
  • Cumin seeds - 1 /2 tsp
  • Urad dal - 1/2 tsp
  • Red chilli powder - 1 tsp ( add 1.5 tsp for more spiciness)
  • Turmeric powder - 1/8 tsp
  • Salt - as needed
  • Chat masala – 1/4 tsp(optional)
  • Sugar – 1/4 tsp
  • Dry grapes/Raisins – 1 tbsp (optional, add if your kids like it)
METHOD

  • In a kadai, heat oil and splutter mustard seeds, urad dal and cumin seeds. Add roasted peanuts, curry leaves and mix well.
corn flakes mixture step1
  • Lower the flame completely and add turmeric powder, red chilli powder, salt and sugar. Mix well.
Corn flakes mixture
  • Lastly add the cornflakes and mix well in low flame till its coated with chilli ppowder. Check for taste and add 1/2 tsp more chilli powder at this stage, mix well and switch off the flame.
corn flakes mixture step2
  • Store in a box after the mixture cools down. Stays crispy and good for 2-3 days when stored in an air tight box.

    Note
    • Do not use raw corn flakes for this recipe. You should deep fry it or microwave before making mixture.
    • I used Kellogg’s brand corn flakes cereals,original flavor. 
    • Adjust the quantity of chilli powder as per taste. But keep the flame low while adding chilli powder else it will burn.
    • For variations, you can add raisins and cashews. Saute raisins till it bulges. I din’t use as my daughter doesn’t like it.
    • You can also add little chaat masala for more flavor.
    Try this easy, yummy, low calorie corn flakes mixture for this Diwali & kids lunch box. !
    Kellogg's corn flakes mixture
    Continue Reading...


    October 16, 2017

    Dry Jamun Recipe With Ready Mix– Dry Gulab Jamun Using MTR mix

    Dry gulab jamun using ready mix
    Dry jamun recipe with MTR ready mix. Last year I made a detailed post on how to prepare gulab jamun with instant mix. Gulab jamun is considered to be the last minute sweet to me for diwali. As its preparation is very easy using readymade mix, I always make it one day before Diwali. This year I wanted to try dry jamun for a change.

    Dry jamoon is our family favorite sweet we buy from Adayar Anandha Bhavan. This year I bought ORKAY Gulab jamun mix in addition to MTR mix as well. It is also equally good but my choice is for MTR because of its softness.

    Dry jamun recipe is very similar to our basic gulab jamun recipe except the soaking time. Usually dry jamoon needs less soaking hours. Some people like to have gulab jamun without sugar syrup. For them , Dry gulab jamun is the ideal choice. It tastes mildly sweet but still juicy with all the syrup in it. Ok, lets see how to prepare dry gulab jamun using mtr mix with step by step recipe. I hope this recipe works for Gits, Aachi, GRB. Bambino and other brands too.
    dry jamun with mtr mix

    Dry Gulab jamun recipe with ready mix


    Gulab jamun recipe with instant mix How to make Gulab jamun using readymade mix, Instant, store bought MTR mix
    Cuisine: Indian
    Category: Sweet
    Serves: 20 nos
    Prep time: 30 Minutes
    Cook time: 15 Minutes
    Total time: 45 Minutes


    INGREDIENTS
    1 cup - 250ml
    • Gulab jamun mix - 150gms/ 1.5 cups
    • Boiled Milk at room temperature - 1/4 cup + 2 tbsp ( + 1 tsp)
    • Cooking oil - to deep fry
    For sugar syrup
    • Sugar - 3 cups
    • Water - 3 cups
    • Cardamom powder or rose essence - 1 tsp
    • Saffron threads – few
    • Chopped nuts – to garnish

    Please watch this video for clear understanding !

    METHOD

    • Read the instructions given on the pack. In MTR mix, its mentioned to add 1 part of water for 4 parts of mix. 400gms of sugar for 150 gms mix packet. So i followed the recipe accordingly.
    • Take sugar and water in a wide bowl and mix well. Keep aside, let it dissolve. In the mean time, take the gulab jamun mix in a wide plate. I used my thambalam/ big round plate. Usually I make chapati dough and other dough in my thambalam as its spacious and convenient to mix well. If the mix has more lumps, sieve it once.  Break the lumps with your fingers while sieving. Do not discard the residue. Add it to the ready mix and mix well again. I got around 1.5 cups of powder. If you are using ORKAY mix, do not sieve the mix. Just break the lumps with your hands.
      Gulab jamun recipe with mix
    • Now add the milk or water little by little and gather all the flour with your fingers. The mixture will become wet and very sticky. Do not worry. Gulab jamun will come out soft if the dough is sticky. I used 1/4 cup + 2 tbsp + 1 tsp milk. So add milk carefully at the end. If you add more milk, jamun will flatten and break. Do not knead the dough using your palm.Mixing should be done only with your fingers. Cover the dough with a plate or invert a bowl. Let it rest for 15 minutes to 1 hour.

    • In the mean time, heat sugar + water and melt it. Add saffron threads, cardamom or rose essence. Boil the syrup for 10 minutes in medium flame till the syrup turns slightly sticky to touch, glossy & resembles oil in consistency. Keep aside. Let the syrup becomes warm.
      Gulab jamun recipe with mtr mix
    • After 30 minutes, take the dough.It will be soft to touch.Do not knead it. Grease your palm with ghee. Make a big gooseberry sized ball by rolling the dough between your palm. Give gentle pressure and roll it continuously for 30 seconds to make it smooth and crack free. As the dough is sticky, jamun balls will not get cracks. If you feel there are cracks, just roll it tight. Cracks will disappear. I made around 20 balls.
      Gulab jamun recipe with mix
    • Heat oil in a kadai and when it gets heated , put a pinch of dough in the oil. If it rises to the top slowly, oil heat is perfect. Now stir the oil with a ladle in the corners. When the oil starts to rotate, drop the jamun balls. I cooked 4 per batch. Stir the oil continuously without touching the gulab jamun. You will find jamun rotate with oil and turns bigger in size. The color of jamun balls change slowly and it cooks uniformly. Once it turns golden brown, remove it in a tissue paper. Do not fry for long time. Jamun will become hard and it will not absorb the syrup. After frying, open & check if its cooked well. Leave the cooked jamun for 2-3 minutes in tissue paper and then drop in the sugar syrup. (If you feel difficult to stir the oil, just keep the flame low, add the balls, flip every now and then till jamun turns golden. Then remove it).
      Gulab jamun recipe with mix
    • If the sugar syrup becomes cold, heat till it becomes medium hot. i.e vapor should start to come from the syrup slightly. Deep fry all the balls in batches, drain in the tissue and drop in the syrup. Let the balls soak in syrup for one hour. It will soak well and almost double in size. Remove and arrange in a bowl. You can serve it as such or coat the balls in dry coconut powder or sugar powder. I felt sugar coating is tastier. Transfer the gulab jamun to a box and store it for 2 to 3 days.No need to refrigerate.
      Gulab jamun recipe with mix
    Enjoy !
    Tips
    • Adding milk for making the dough helps to give soft jamun. You can use water as well. My friend Swarna adds just a tsp of milk in the beginning and add then water to make the dough.
    • Dough should be really sticky to get soft Gulab jamun. If you have added more milk by mistake, don’t panic. Just cover the dough with a lid and let it rest for an hour.Grease your hands and make smooth balls.If it comes out without cracks, then proceed and deep fry only one ball for a trial. If it disperses in oil, then add a tsp of maida, mix well and make another ball. Test it and proceed further.  But adding more milk flatten the jamun. So please be careful while adding milk.
    • Jamun balls should be crack free. Roll it for 30 seconds continuously.This helps to seal the cracks while rolling. Do not press it too hard while rolling, but give gentle pressure.
    • Deep fry the balls only at low temperature else balls will get browned quickly without cooking inside.
    • Gulab jamun balls will disperse in oil  or cracks more if the oil temperature is too low. So Check the temperature before you drop the balls.
    • Similarly cracks will form if the jamun balls become dry.so keep it covered all the time till you finish the procedure.
    • Sugar syrup should not be too hot while you drop the jamun. It should be medium hot or warm. Similarly Gulab jamun should not be too cold. 
    • Gulab jamun will flatten if you add more milk. It will also flatten if the sugar syrup is less. Make sure the sugar syrup is enough for all the balls to absorb and dunk in completely.
    • If the quantity of sugar syrup is less, then jamun will not turn soft and double in size.
    Try this easy, mildly sweet dry jamun for a change. You will love it !
    Dry gulab jamun with ready mix

    Continue Reading...