Search Chitra's Food Book

Showing posts with label NO ONION NO GARLIC RECIPES. Show all posts

August 22, 2016

Gopalkala Recipe / Dahi Poha – Easy Krishna Janmashtami Recipes

Gopalkala recipe
If you are looking for an easy Janmashtami recipe, Gopalkala is the best choice. It is a most popular dish prepared on the occasion of Janmashtami/Krishna jayanthi in North India. It is prepared in temples, offered to Lord Krishna and served as prasad during the festival for the devotees. When  Lord Krishna was young, he used to mix all his Cowherd friend’s lunch recipes with his favorite curd, butter, milk, made this dish and served his friends. 'Gopal' is the name of Lord Sri Krishna. 'Kala' means the mixture. So this dish is named as Gopalkala. It is is a mix of beaten rice/ poha, curd,milk, ghee, green chilli, sugar, salt and cucumber.This is also called as Dahi poha. I followed the recipe from this space. There is no hard and fast rule to make this dish. This salty and sumptuous dish is prepared in every home in North India where the festival of Janmashtami is observed. It is extremely easy to prepare and hardly takes few minutes to prepare. Try this easy Janmashtami recipe and have a great celebration !

Continue Reading...


August 9, 2016

Andhra Pulihora Recipe – How To Make Chintapandu Pulihora Pulusu

Chintapandu pulihora
Andhra Pulihora also known as Chintapandu Pulihora in Telugu is a must try recipe during festival time. As Varalakshmi Vratham is fast approaching, I thought of sharing some Andhra style neivedyam recipes for this festival. This morning, I was asking my friend Megha about Varalakshmi Vratham special recipes as her MIL belongs to Andhra. She suggested recipes like Boorelu, appalu, Garelu and Pulihora. As our family is a big fan of tamarind rice, I started with this recipe. The ingredients and preparation of Andhra Pulihora is completely different from our Tamil nadu style Puliodharai. Its a very simple recipe without any grinding job. In the traditional temple style pulihora recipe, they add sesame seeds powder or mustard powder. But I made the basic version as told by Megha and watched Attammaa TV YouTube video recipe too for more reference. This Puliogare paste i.e. Pulihora Pulusu can be quickly made in minutes if you have readymade tamarind paste in hand. Its an ideal choice for quick lunch box recipe. Raksha loved it a lot and asked me for second serving as well. But this pulihora needs a standing time of minimum 2 hours for all its flavors to blend well. So friends do prepare this rice at least two hours before serving to relish its actual taste and flavor. Now lets see the step by step recipe of how to prepare Andhra Pulihora / Chintapandu pulihora in detail.

Check out my Tamil nadu style Puli Sadam and Pepper Puliogare recipes too.
Continue Reading...


June 24, 2016

Batata Poha Recipe Without Onion – Gujarati Aloo Poha – How To Make Potato Poha

Batata poha without onion
Batata poha ( Batata – Potato, Poha – Rice flakes in English, Aloo Poha in Hindi) is a quick breakfast and teatime snacks recipe which is very popular in Gujarat and Maharashtra. Recently I posted Maharashtrian Kanda pohe recipe( Onion poha). Following that, I tried this Gujarati style Batata poha recipe without onion and garlic for our breakfast.There is no much difference between ingredients of Gujarati & Maharashtrian style batata Poha recipes. So I don’t want to follow the same recipe with slight variations instead I tried this recipe in which spice powders and Garam masala powder were used. I am really not sure whether this is the authentic Gujarati version but it came out very flavorful and definitely tastier than our usual Kanda batata poha. Working women and bachelors can try this for making quick breakfast or dinner and enjoy it with a hot chai. You will find it tummy filling and healthy too ! Lets see how to prepare Gujarati Batata poha/ Aloo Poha recipe without onion with step by step photos !

Check out my Karnataka style Chitranna & Tamilnadu Lemon Aval upma, Milagu Jeeraga Aval recipes too.

Batata poha -Gujarati Aloo poha

Batata poha recipe - Gujarati Aloo Poha Recipe


Batata poha recipe - Gujarati Aloo Poha Recipe How to make aloo poha - Gujarati Batata poha without onion and garlic for quick breakfast !
Cuisine: North Indian
Category: Breakfast/ snack
Serves: Serves 2
Prep time: 10 Minutes
Cook time: 10 Minutes
Total time: 20 Minutes


INGREDIENTS
1 cup - 250ml
  • Thick poha - 1 cup
  • Potato - 1 no ( medium. peeled and sliced thinly)
  • Peanuts - 2 tbsp
  • Cooking oil - 3 tbsp
  • Mustard seeds - 1/2 tsp
  • Cumin seeds - 1/2 tsp
  • Curry leaves - few
  • Asafetida/Hing - a pinch
  • Red chilli powder - 3/4 to 1 tsp
  • Dhania powder -1 tsp
  • Garam masala powder - 1/2 tsp
  • Sugar – 1 tsp
  • Salt & water - as needed
  • Turmeric powder - 1/4 tsp
To garnish
  • Coriander leaves - few
  • Pomegranate seeds - a handful
  • Lemon juice - few drops
  • Raw onion - finely chopped ( optional, I din't use)
METHOD

  • Wash the thick poha at least twice to remove the dust. Soak it in enough water. i.e the level of water should be just 1/2 inch above poha. Close the bowl with a lid and let it sit for 10 to 15 minutes. In the mean time, wash & peel the skin of potato. Chop it into thin slices as shown in the picture so that it can cook quickly.

  • Heat 1 tbsp oil in a kadai and roast the raw peanuts first. In the same kadai, add another 2 tbsp of oil and splutter mustard seeds, cumin seeds and turmeric powder along with roasted peanuts.
Batata poha recipe
  • Add the chopped potato pieces, curry leaves and mix well ( If using boiled potato cubes, add it at the end along with Poha, no need to saute it).Add turmeric powder and salt for the potato to saute & cook quickly. Cover the kadai for sometime, simmer the flame and let the potato pieces cook till soft. Now add the red chilli powder, dhania powder, garam masala powder , sugar and if needed some turmeric powder. Mix well till all the spices well blend with cooked potato.
Batata poha recipe
Batata poha recipe
  • Lastly add the soaked poha and mix well till all the masala coat well. Check for taste and add more salt or spice powders as per your need.
Batata poha recipe
    Gujarati batata poha


  • After the poha is heated well, switch off the flame and garnish with finely chopped coriander leaves, sprinkle some lemon juice. Add some pomegranate seeds if you wish. Serve hot with a cup of Chai/Tea. Enjoy !!


  • Note
    • You can saute finely chopped onions along with potato pieces if you wish.It is known as Kanda batata poha in Hindi i.e Onion Potato Poha
    • Do not reduce the quantity of oil. Oil is more important to make a tasty poha. It doesn’t look dry !
    • Adjust the quantity of spices as per your taste
    • Adding sugar gives a mild sweetness to the dish. So skip it if you don’t like.
    • Using thin poha is also OK but soak it adding correct amount of water else the dish will become mushy.
    Try this easy, yummy Gujarati breakfast dish at home and enjoy with a cup of chai !
    Gujarati batata poha
    Continue Reading...


    February 16, 2016

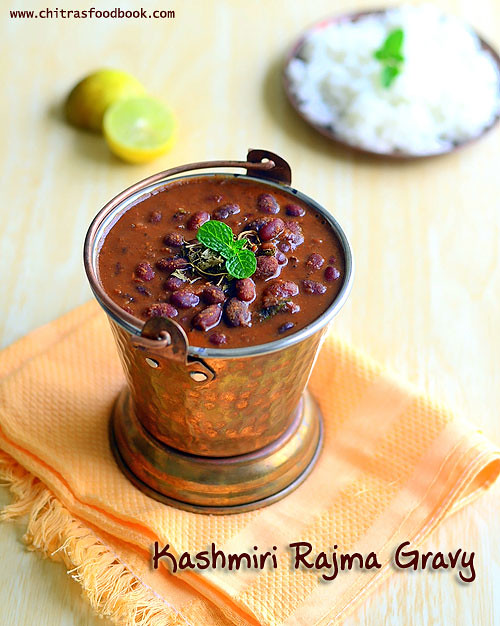
    Kashmiri Rajma Gravy – Red Kidney Beans Gravy Without Onion, Garlic For Rice,Chapathi

    Kashmiri Rajma masala  

    Recently I bought a pack of Rajma ( Red kidney beans in English,Karamani or Karamani Payir in Tamil , Rajma in Punjabi,Hindi , Capparadavare in Kannada, Chikkuduginjalu / Nallachikkudu in Telugu ) to try some gravy/masala for rice. I have heard a lot about Rajma Chawal, a popular North Indian Dish. So I wanted to try that but then I found the pack had Kashmiri Rajma which was smaller in size than the usual rajma. So I browsed for some Kashmiri rajma masala gravy that can pair with rice and chapathi as well. I found one in Divine taste using freshly ground garam masala powder. It is a no onion no garlic Jain recipe too. I became double happy and tried it for our lunch with slight modifications in the original recipe. It came out very well. We had the same for our dinner as a side dish for Chapathi/Roti. It tasted yum and we were happy to have a healthy, protein rich gravy for our lunch & dinner. Ok lets see how to make Kashmiri Rajma masala for rice and chapathi.

    Check out my Rajma Sundal & Rajma Biryani recipes too.

    Continue Reading...


    February 3, 2016

    Chanar Dalna Recipe – Bengali Recipes

    Chanar dalna recipe
    Last year i tried few Bengali dishes to share a lunch menu collection. I posted few dishes from the menu and this recipe was in pending list.Today when i was checking my drafts,i found this post lying in the folder.Chanar Dalna is an authentic vegetarian Bengali dish served for rice.It is made using potato and freshly prepared Chenna/homemade paneer.But i used store bought paneer and referred Sanjeev Kapoor’s recipe.Its a no onion no garlic recipe too.It came out pretty well.This weekend i will share the Bengali lunch menu platter.Now lets see how to make Bengali style Chanar Dalna Recipe – Vegetarian version !
    Do check out my other bengali recipes

    Continue Reading...


    January 29, 2016

    Bharwan Bhindi Recipe - Stuffed Okra Fry

    Bharwan bhindi recipe
    I love to try fry recipes with stuffed vegetables.Usually i made Stuffed brinjals like this.But its purely of South Indian style.So i was looking for a typical North Indian style stuffed vegetable fry recipe.This morning I came across Bharwan( meaning stuffed in English) bhindi i.e stuffed Okra masala fry in my favorite Vahrehvah Vahchef’s youtube video. The recipe for masala was so simple with besan & less oil.Its a no onion no garlic Jain recipe and it looked mouth watering too.So without any second thought,i went for this recipe by making some small changes as per my family’s taste buds.It came out really well and got thumbsup from SendhilDancing.As the chef says,the masala used in this recipe can be used to make Bharwa Shimla mirchi, Bharwan Karela and even stuffed tindora.And this stuffed bhindi fry would be a great side dish for roti/chapathi , simple Veg pulao or any paratha. But i loved to have it as a snackWinking.Lets see how to cook bharwa bhindi recipe with step by step pictures.

    Continue Reading...


    January 20, 2016

    Milagu Jeeraga Aval Recipe – Pepper Poha - Poha Recipes

    Milagu aval
    Last year I got few requests from readers to share different types of poha recipes( Aval in tamil & Malayalam, Avalakki in Kannada, Rice flakes in English, Poha in Hindi, Atukulu in telugu). I have never thought or tried any recipes beyond my lemon aval/Lemon poha. When I got those requests, I started looking for varieties of poha recipes. At that time, my MIL taught me this easy pepper poha (Milagu aval in Tamil) recipe for breakfast & dinner. Its a super easy and super quick recipe that needs just 10 minutes to prepare.We usually make pepper idiyappam but never tried with poha. As Sendhil loves pepper based recipes, it was like double bonanza for me.. No side dish is required for this recipe. So I make this atleast twice in a week. Working women and bachelors can try this recipe if you like pepper recipes. You would love its taste and simplicity. Its is a no onion no garlic Jain recipe. So it can be prepared during festival seasons or for vrat/fasting days.Ok, lets see how to make this easy and yummy breakfast/dinner recipe using poha – Milagu aval/Pepper Poha !! I will try to share more poha recipes in my upcoming posts.

    Continue Reading...


    November 17, 2015

    Easy Arisi Upma | Rice Upma Recipe In Pressure Cooker - Fasting Lunch Recipes/Vrat Food

    Arisi upma
    Arisi upma /Rice upma is our family favorite recipe. I learnt this from my MIL.Its one of our traditional recipes in which raw rice & toor dal is soaked in water for 2 hours,ground coarsely and slowly cooked in Vengala paanai/Brass pot with seasoning. It takes nearly 45 minutes to prepare in pot. This upma is also prepared by Iyengars/Iyers. 

    Mostly we make this upma for Lunch and sometimes for breakfast or dinner during fasting/Vrat/Vratham days like Maha Shivratri, Ekadesi, Kanda Shasti and Karthigai. Today for Kanda Shasti,  we made this rice upma along with no onion no garlic sambar recipe and sweet puttu for our lunch.You can make some payasam, pongal or some sweet dishes adding jaggery and offer for Neivedyam. Sambar & coconut chutney are the best side dishes for this upma. 

    My MIL taught me how to make this upma quickly & easily using pressure cooker without even soaking rice & dal. You can make in instant pot too. So I thought of sharing this simple and easy fasting lunch recipes idea for you all to make your food quickly under 15 minutes on fasting days. If you are allowed to take raw rice on Vrat days, do try this easy upma recipe. You will love it.  Lets see how to make our South Indian breakfast recipe - Rice Upma/Arisi upma easily in a pressure cooker without soaking rice.

    I have discussed the traditional method in Notes section. Please have a look at it !

    Rice upma

    Rice upma recipe/Arisi upma


    Rice upma recipe/Arisi upma How to make rice upma recipe for fasting - Vrat food !
    Cuisine: Indian
    Category: Breakfast/Dinner
    Serves: 2
    Prep time: 10 Minutes
    Cook time: 20 Minutes
    Total time: 30 Minutes


    INGREDIENTS
    1 cup - 240ml
    • Raw rice/Pacha arisi - 1 cup
    • Toor dal - 1.5 tbsp
    • Salt - as needed
    • Water - 2.25 cups
    • Pepper corns - 1/2 tsp  ( crushed powder)
    To temper
    • Cooking oil - 2 tbsp
    • Mustard seeds - 1/2 tsp
    • Urad dal -1 tsp
    • Chana dal - 2 tsp
    • Red chillies - 2nos
    • Ginger - 1 inch piece( finely chopped)
    • Curry leaves - few
    • Asafetida/Hing - 1/8tsp
    Click HERE for Sambar Recipe ( Omit onions)
    METHOD
    • Take raw rice & toor dal in a big mixie jar and grind it coarsely like rava. Remove in a bowl. Wash well, drain the water and set aside. If you are using small sized jar, grind in batches. Crush the pepper and set aside.
    Arisi upma recipe
    • Heat a cooker base with oil and temper mustard seeds, urad dal and chana dal. Saute until dals turn golden brown. Now add the pinched red chillies, ginger, curry leaves and hing. Saute for a while. Add water and required salt.
    • When the water comes to a roll boil, add the ground rice+dal. Keep mixing in high flame till 80% of the water is absorbed by the rice. Close the cooker and put the weight valve. Cook in low flame for one whistle. It will take 10-15 minutes based on the size of cooker.
      Arisi upma

    • Open the cooker after the steam is released. Add the crushed pepper powder. Mix well and serve hot with sambar or chutney ! This upma looks mushy when hot but it will separate as it cools down.
    Arisi upma
    Note
    • Traditionally rice & dal should be washed & soaked for 2 hours. Then it should be spreaded in a towel or paper for 10 minutes. It should be ground coarsely in batches. By doing this way, you get really soft upma. But the method I have suggested saves time and this upma can be done quickly.So its finally your choice of making it : ))
    • You can replace red chillies by green chillies too.
    • You can make the same upma using broken rice/Noi.

    Enjoy this traditional, easy rice upma recipe for your breakfast or dinner with sambar or Chutney !
    Arisi upma recipe

    Continue Reading...


    October 14, 2015

    Thenga Manga Pattani Sundal Recipe-Beach Style Sundal

    Thenga manga pattani sundal
    I wanted to try this thengai mangai pattani sundal(Coconut,Raw mango,peas) during last year Navaratri.But I couldn’t do it.So this year I was very much stubborn & determined to start my Navratri Sundal recipes posts only with this most popular Chennai Marina Beach style sundal recipe.Luckily I found a raw mango in the market yesterday and bought it even though it was too costlyTongue.Generally when we think about Chennai beach, apart from the wonderful sea breeze,snacks like Kara pori,Green peas masala chaat, fire roasted corn, sweet cotton candy ( Panchumittai) and thenga manga pattani sundal flashes in our mind.But frankly speaking,I have never tasted any one of them in the beachSad.I visit Chennai very rarely and that too to attend weddings and other family functions.So when I go there,I directly go to our relatives house.As soon as the function gets over,we would be off to Bangalore immediatelySigh.This year too we have planned for a Chennai trip in a month or two.This time I have demanded few things to Sendhil like Shopping in T Nagar,Food at Saravana Bhavan especially Vada curry & Kaima idli and most importantly,a visit to Marina beach.I think Sendhil would keep up his promise and take me to all these placesWinking.After I taste the real sundal in the beach,I will update this post to match its original taste.Today I made this sundal following the recipe from Radhika’s blog.It came out very well and tasty.With the flavor & tanginess of raw mango,it tasted awesome !! Friends,do try this sundal for Navratri neivedyam and share your feedback.If you don’t have raw mango in hand,add more lemon juice and use grated carrots.After doing the pooja,you can also add finely chopped onions & relish this sundal.Lets see how to make this yummy Beach style Thenga Manga Pattani Sundal .
    Check out my beach style Kara pori/Spicy puffed rice recipe if interested !!

    Continue Reading...


    September 30, 2015

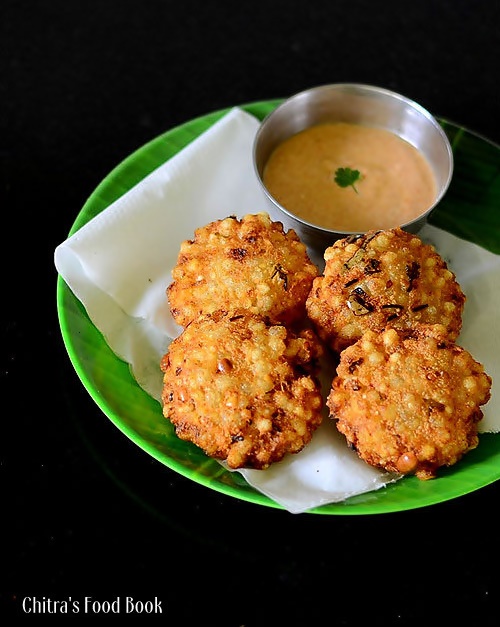
    Sabudana Vada With Chutney Recipe / Javvarisi Vadai / Sago Vada

    Javvarisi vadai
     Sabudana vada with peanut chutney is one of the most popular vrat / fasting dish in North IndiaNavratri is around the corner. I am sure most of you would look for no onion no garlic fasting recipes. Sago/Tapioca pearls(Sabudana in Hindi, Javvarisi in Tamil) is considered to be one of the most important ingredient used for cooking vrat recipes.
    People usually make Sabudana khichdi, Kheer in North India and Javvarisi Upma, Payasam in South during fasting days either for breakfast or for dinner. I always wonder why sabudana is consumed on Vrat days even though it is high in carbohydrates & Calories. I browsed few websites and found some health benefits like Sabudana gives quick energy. It is very easy to digest & gives a cooling effect on the system. It is quite low in fat, protein and does not have any minerals or iron. So  milk, peanut & potatoes are added with sago to increase its nutrtious value.
    Basically I love sabudana kheer /Javvarisi Payasam prepared with sugar or jaggery more than other sabudana dishes. But this year during this Navratri festival, I wanted to explore varieties of sabudana recipes. So I started with Maharashtrian style Sabudana vada/Sago fritters and made a quick video along with step by step pictures. Even though I tried it for the first time, its result made me felt as if I am making it regularly at home
    Yes, it came out super crispy and tasted great with this easy peanut curd chutney. This chutney is one of the best side dishes for sabudana vada as mentioned HERE. I too loved this combo very much. I have tasted sabudana vada only once in GOLI VADA PAV outlet. But its taste and appearance was completely different than this one. I will try to experiment that vada and post it here. 
    Now lets see how to prepare Sabudana Vada recipe for Vrat snacks. You can try shallow frying or Air fry it for diet version. Serve & eat it hot to enjoy its best taste !
    Check out my Javvarisi vathal/Vadam & Mango Sago Pudding


    Sabudana vada recipe


    Sago vada / Sabudana Vada- Javvarisi Vadai


    Sago vada / Sabudana Vada- Javvarisi Vadai How to make crispy Sago vada/Sabudana vada for vrat and teatime snacks.
    Cuisine: North Indian
    Category: Sweet
    Serves: 4
    Prep time: 10 Minutes
    Cook time: 15 Minutes
    Total time: 25 Minutes

    INGREDIENTS
    1 cup = 240ml
    • Sago/Sabudana/Javvarisi - 1/2 cup ( Big variety,NO nylon)
    • Medium sized potato - 1 no
    • Roasted peanuts - 2 tbsp
    • Arrowroot powder or rice flour or corn flour - 1/2 tbsp ( I used corn flour)
    • Green chillies - 1 no ( Finely chopped)
    • Ginger - 1/2 inch piece ( -do-)
    • Coriander leaves - 2 tbsp (-do-)
    • Cumin seeds/Jeera - 1/2 tsp
    • Sugar-1/4 tsp
    • Lemon juice – 1/2 tsp
    • Salt - as needed
    • Oil - to deep fry
    Peanut chutney for sabudana vada
    • Fresh curd – 1/4 cup
    • Roasted Peanut powder – 2 tbsp
    • Red chilli powder – 1/2 – 1 tsp
    • Turmeric powder – 1/8 tsp
    • Cumin powder – 1/4 tsp
    • Sugar – a pinch
    • Salt – as needed
     HOW TO MAKE SABUDANA VADA - METHOD
    • Wash & soak the sabudana overnight Or 4-5 hours adding enough water to cover it. Soak till it becomes soft. Drain all the excess water & squeeze the sabudana. Take in a bowl.
    how to make sabudana vada
    • Pressure cook potato, peel the skin and mash it well. Powder the roasted peanuts coarsely. Chop the green chilli, ginger & coriander leaves.
    how to make sabudana vada
    • Take the squeezed sabudana,mix the mashed potato, peanut powder, Corn flour or arrowroot powder, chopped green chilli, ginger, coriander leaves, sugar & salt ( Use arrow root powder during fasting days). Mix it well & make a dough. DO NOT ADD WATER. Soaked sabudana & mashed potato along with rice flour makes a non-sticky dough.(TIP: If sago has more water content,vada will absorb more oil. If sago is too dry, vada may crumble or dissolve in oil. So take care and bind the mixture well)
    how to make sabudana vada
    • Take a small ball sized batter and make a round. Pat it to bring vada shape. Arrange in a plate.
    how to make sabudana vada
    • Heat oil in a kadai and put a pinch of batter. If it rises to the top, Oil is right. Keep the flame medium. Now drop the vada and cook in batches. Flip the vada and cook both sides till golden brown. This vada takes more time to turn golden brown. So keep flipping it until u get the color (TIP: Deep fry the vada patiently in medium flame else it may turn brown faster leaving the inner portion uncooked. Slow frying helps to bring crispy exterior. Make sure the temperature of oil is correct, else vada will absorb more oil)
    how to make sabudana vada
    Keep the unused batter in refrigerator because vada may absorb more oil if kept outside for long time.

    PEANUT CHUTNEY FOR SABUADANA VADA

    Powder the roasted peanuts.Take the curd,powdered peanuts, red chilli powder, turmeric powder, salt, sugar. Mix well and check for taste. Serve hot vada with peanut chutney !
    Note
    • For variations replace green chilli with a tsp of red chilli powder.
    • You can skip rice flour/corn flour with arrow root powder during fasting days.
    • Add more green chillies for spicy vada.
    • You can also add garam masala powder for more spicy flavor. But its not the authentic recipe.

    Enjoy crispy sabudana vada with peanut curd chutney ! Tastes yum !!
    Sabudana vada with chutney


    Continue Reading...


    June 18, 2015

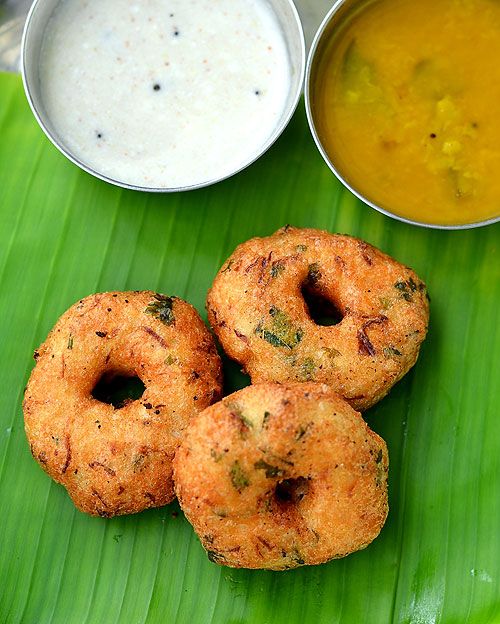
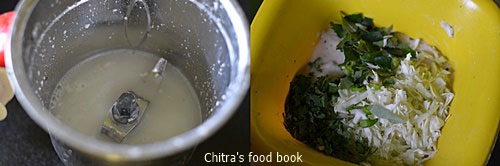
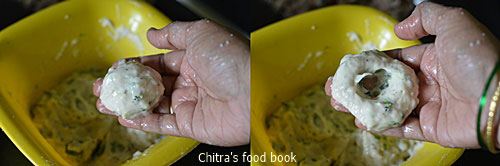
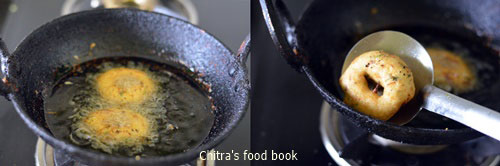
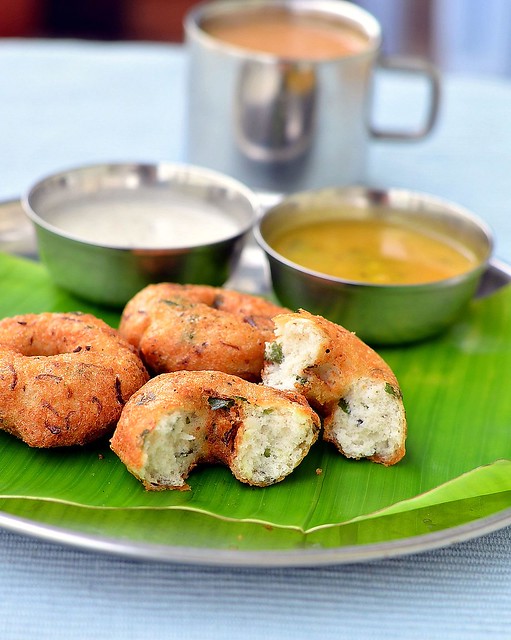
    Cabbage Vada Recipe | Urad Dal Vada With Cabbage - Muttaikose Vadai

    Few years ago I posted Mixed vegetable Urad dal vada. But I have not tried Urad dal vada adding cabbage alone / Muttaikose vadai in Tamil. Yesterday I made this cabbage vada for our No moon Day No onion No garlic lunch menu. I was scared whether vada would get the raw smell of cabbage. But to my surprise, it was so crispy and superb in taste. It’s a nice tea time snack. I couldn’t even find the trace of cabbage smell in it. Infact cabbage acted as a binding agent and made the batter thick enough to shape the vada easily too. It’s a great replacement for onion. Just give a try. You will come to know. Lets see how to make cabbage vadai in detail.


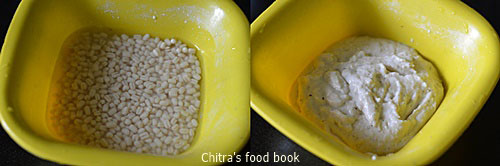
    Please refer my urad dal vada/Medhu vadai video recipe for better understanding of grinding and shaping the batter.

    check out this recipe with video for grinding vada batter using grinder.

    Cabbage Vada Recipe


    Cabbage Vada Recipe Cabbage vada recipe - Urad dal vada adding cabbage
    Cuisine: Indian
    Category: Snacks
    Serves: 10 
    Prep time: 40 Minutes
    Cook time: 10 Minutes
    Total time: 50 Minutes


    INGREDIENTS

    • Round Urad dal - 1/2 cup
    • Finely chopped Cabbage - 1 cup
    • Curry leaves - few
    • Green chilli - 2 nos ( finely chopped)
    • Coriander leaves - few
    • Ginger - 1/2 inch piece
    • Hing /Asafetida - 1/4 tsp
    • Salt & water- as needed
    • Cooking oil - to deep fry
    HOW TO MAKE CABBAGE  VADA WITH URAD DAL - METHOD
    • Wash and soak the urad dal for at least 45 minutes and maximum 4 hours. Drain all the excess water and take the urad dal in a mixie jar. First grind the dal adding very little water( 2 tbsp). Grind the dal to the maximum by wiping the sides of jar. No need to add salt. Wipe the sides of jar and add a tbsp of water. 
    • Again grind the dal till it turns smooth and thick. Add water only in a tbsp at a time. So add more if needed. The batter should be stiff and smooth. Just drop a pinch of batter in a bowl of water. If the batter floats, the consistency is right. If it drowns, it shows you have added more water. Please refer my Urad dal video grinding for better understanding.
    • Remove the batter in a bowl. Add little water to the mixie jar and grind it. Collect that water and use it for dipping your hands before shaping the vada. 
    • Beat the batter with your hands for few minutes to remove air bubbles. This helps to prevent vada from bursting in oil. To the batter, add finely chopped cabbage, green chillies, curry leaves, coriander leaves and ginger bits. Mix well. Add the required salt. After you mix all these ingredients, batter would become thick and you will be able to shape the vada easily.

    • Heat oil to deep fry. Drop a pinch of batter in oil. If it rises immediately to the top, oil is just right. Now keep the flame medium. Take a golf sized ball from the vada batter. Pat it slightly and make a hole in the center.
    • Drop the vada in the oil and deep fry till cabbage turns golden brown. The color of vada may vary based on the time you cook. I love to take my vada golden brown. So I always cook the vada in high flame for few seconds before removing from oil.
      Serve hot with chutney.Enjoy !
    Note
    • Grinding urad dal in mixie yields less batter than grinding in grinder. But you can make 10 medium sized vada for this quantity.
    • You can also add coarsely ground pepper along with other ingredients.
    • For kids you can grind green chillies along with ginger and add to batter.
    • If u feel the batter is too watery and if you are not able to make shapes, add little rice flour. But consume the vada when it is hot because adding rice flour makes the vada hard when it cools down.
    • My MIL adds a tsp of toor dal while soaking urad dal to avoid oil absorption. But proper grinding of batter with right amount of water gives you oil free vada.


    Try this no onion Urad dal vada recipe for your tea time. Tastes yummy !


    Continue Reading...


    May 26, 2015

    Udupi Sambar Recipe-Hotel Style-No Onion No Garlic Sambar

    Udupi hotel sambar
    Last week I tried this Udupi hotel sambar recipe for idli and that too without onion,garlic brahmin version after years.I came across this recipe in “The Hindu” Food safari section.The recipes I have tried from that section is always a super hit in my home.The best example is my soft kulcha recipe.The taste & cooking method of this udipi sambar is very close to my Hotel idli sambar using freshly ground sambar powder.So Sendhil & myself liked it a lot and relished with idli,dosaHappy.Try this recipe if you are looking for a no onion no garlic side dish for idli,dosa & pongal.You will love it !Lets see how to make this Karnataka Udupi's most popular sambar recipe with step by step pictures.
    Continue Reading...


    March 22, 2015

    Ugadi Lunch Menu-Karnataka Style

    Karnataka lunch menu
    Friends, this week I have shared a Karnataka style Ugadi lunch menu instead of Sunday biryani recipe.  Yesterday I made this simple yet delicious lunch menu for Ugadi celebration. So I thought of sharing that platter here. Its been my long time wish to post a Karnataka style lunch menu in my blog. So I took Ugadi festival as an opportunity and made a simple lunch menu.

    After I prepared Holige successfully, I asked my friends to suggest me an easy lunch menu idea for Ugadi festival. Based on their suggestions, I made Obbattu, Obbattu saaru, Mavinakayi chitranna, Mysore Bonda, Beans palya, Shavige payasa, dal, plain rice and the most popular Kosambari recipe. Also Megha suggested me a very easy recipe for Obbattu saaru.

    As I had made Obbattu in the previous day, making this menu was easy for me. In this post, I have shared the recipes of Kosambari( using moong dal ) and beans palya. I have made a separate post for Obbattu saaru and Mavinakayi chitranna. I have given links for all these recipes below. Please check it. Ok, Now lets see this yummy Karnataka lunch menu recipes for Ugadi festival.

    Check out my other lunch menu posts here . 

    Wish you all a very happy Ugadi !!

     Ugadi lunch menu

    Ugadi Lunch Menu


    Ugadi Lunch Menu Ugadi Lunch Menu Recipes-Karnataka style
    Cuisine: Indian
    Category: Lunch menu
    Serves: 2
    Prep time: 30 Minutes
    Cook time: 1 Hour
    Total time: 1H30M


    INGREDIENTS
    Kosambari recipe
    • Yellow moong dal - 2 tbsp
    • Carrot - 1 no small
    • Green chilli - 1 no
    • Cucumber- a small piece
    • Coriander leaves - 2 tbsp
    • Grated coconut - 3 tbsp
    • Salt - as needed
    To temper
    • Cooking oil - 1 tsp
    • Mustard seeds - 1/4 tsp
    • Curry leaves - few
    • hing/asafetida - a pinch ( optional)
    Beans palya recipe
    • Beans - 20 nos
    • Grated coconut - 1/4 cup
    • Green chillies - 2 -3 nos
    • Salt & water - as needed
    To temper
    • Cooking oil - 1 tbsp
    • Mustard seeds - 1/2 tsp
    • Urad dal - 1 tsp
    • Curry leaves – few
    Click these links for other recipes
    METHOD

    • I assumed that you have made obbattu/Holige the previous day and shared the procedure of making other dishes below.
    • Wash and soak moong dal for 30 minutes to make kosambari. Wash and soak urad dal for mysore bonda for 45 minutes in enough water.  You can also make vada instead of bonda. 
    • To make this menu, pressure cook one cup of rice along with moong dal in a small closed container. Soak tamarind in water for 20 minutes. Pressure cooking rice and dal will be done in 15 minutes.
    • In another burner, boil the vermicelli and let it cook. In the mean time, wash and peel the skin of raw mango. Grate it and finely chop the green chillies. Heat a pan and do the tempering, add green chillies and grated mango.
    • Saute well adding salt and turmeric powder. Mix well till mangoes get cooked. Lastly add the grated coconut, saute for a minute and switch off the flame. After the pressure is released, spread the rice in a plate and let it cool. Add this maavinakayi paste and mix well adding sesame oil. Adjust salt and garnish with coriander leaves. Please refer my mavinakayi chitranna recipe post for another method.
    • Now vermicelli will be cooked well, add milk, sugar and roasted nuts and remove from the flame. Set aside.
    • To make kosambari, take the soaked moong dal, drain the water completely and add grated coconut, grated carrot, finely chopped cucumber, green chillies and coriander leaves. Mix well. Add salt just before serving otherwise this mixture will leave more water while serving. So add salt only before serving. Lastly do the tempering and Kosambari is ready.
    • For beans palya,wash and chop the beans into small circles. Heat oil in a kadai and temper mustard seeds, urad dal and curry leaves. Add finely chopped green chillies and beans. Add the required salt and saute well for few minutes. Sprinkle some water and cover cook the beans till its done. Mix it once or twice in the middle. Add the grated coconut in the end, give a stir and switch off the flame. Beans palya is ready.
    • Lastly you can do the obbattu saaru by using the reserved holige pooran dal water. Please check the link for obbattu saaru recipe above. By now, urad dal would have been soaked well. Grind the batter and make bonda. Serve saaru and bonda really hot to enjoy its best taste. So I made it at the end.
    You can finish the entire process within an hour if  you plan it right. Serve everything hot and enjoy !

    Try this easy yet yummy lunch menu and enjoy Habbada Oota on this auspicious day !

     Ugadi lunch menu
    Continue Reading...