Search Chitra's Food Book

December 28, 2021

Paneer Bhurji Recipe - How to make Paneer Bhurji

Paneer bhurji recipe

Paneer bhurji is a simple, quick and tasty side dish for chapathi / roti. It can be prepared easily under 15 minutes. All you need is some onion, tomato for the base along with whole spices and spice powders. You can serve this paneer bhurji as side dish for roti / chapathi or stuff and roll it to make paneer frankie and enjoy ! You can also stuff this paneer bhurji in two bread slices, toast to make it a sandwich. Sometimes, I use this paneer bhurji to make paneer masala dosa too.

Friends, do try this easy and yummy Paneer bhurji and enjoy as you like. 

Paneer bhurji

Check out my other PANEER RECIPES 

Paneer bhurji recipe


Paneer bhurji recipe

Paneer bhurji recipe - Scrambled paneer masala recipe for chapathi / roti.


Cuisine: Indian
Category: Side dish
Serves: 3
Prep time: 10 Minutes
Cook time: 20 Minutes
Total time: 30 Minutes


INGREDIENTS
1 cup = 250ml
  • Paneer / Cottage cheese - 200 gms
  • Cooking oil - 2 tbsp
  • Cumin seeds – 1/2 tsp
  • Big onion – 1 (finely chopped)
  • Ginger garlic paste – 1 tsp
  • Big Ripe tomato -1 (-do-)
  • Turmeric powder - 1/4 tsp
  • Red chilli powder - 1/2 tsp
  • Crushed kasoori methi – 1 tsp
  • Garam masala powder - 1/2 tsp
  • Salt - as needed
  • Sugar - 1/4 tsp
  • Water - as needed
  • Coriander leaves - to garnish
HOW TO MAKE PANEER BHURJI
  1. Wash and scramble the paneer into small pieces using your hands.
  2. Heat oil and splutter cumin seeds. Saute onion till transparent.
  3. Add ginger garlic paste and saute till raw smell goes off.
  4. Add tomato and saute till mushy. Add red chilli powder, turmeric powder, garam masala powder, salt and sugar. Mix well.
  5. Lastly add the scrambled paneer. Mix gently and switch off the flame.
  6. Add crushed kasoori methi and finely chopped coriander leaves.
  7. Mix and serve with roti/ chapathi.
METHOD - STEP BY STEP PICTURES
  • Wash the Paneer and scramble into small pieces or grate it using a big holed grater. Do not make it mushy. Set aside.
  • Paneer bhurji
  • Heat oil in a kadai. Splutter cumin seeds. Saute onion, ginger garlic paste till raw smell goes off.
  • Paneer bhurji
  • Now add the tomato and saute till mushy. Add turmeric powder, red chilli powder and garam masala powder. Add salt and sugar.
  • Paneer bhurji
  • Mix well and lastly add the scrambled paneer. Mix gently and add crushed Kasoori methi. Switch off the flame and garnish with finely chopped coriander leaves.
  • Paneer bhurjiPaneer bhurji
  • Remove and serve hot with chapathi / roti. 


Enjoy !

Note

  • For variations, you can saute 1/4 cup of chopped capsicum along with onion.
  • You can also add 1/2 tsp of coriander seeds powder if you like.

  
  Easy, yummy Paneer bhurji is ready to enjoy !

 Paneer bhurji


Continue Reading...


December 21, 2021

Pirandai podi–Adamant Creeper Chutney Powder for Rice

Pirandai podi

I have kept an adamant creeper plant (Pirandai chedi in Tamil) in my balcony garden. Usually I make Pirandai thogayal or Pirandai kuzhambu. Sometimes, I make Pirandai dosa OR Red rice Pirandai dosai too.  This time, I tried Pirandai podi for a change. It came out so tasty and flavorful. We enjoyed it mixing with plain rice adding ghee. I personally liked this podi with idli, dosa too.

Friends, do try this Pirandai podi at home / Adamant creeper chutney powder recipe and store up to 2 weeks, enjoy with plain rice, idli, dosa if you like.

pirandai podi recipe

Pirandai podi / Adamant creeper chutney powder for rice


Pirandai podi / Adamant creeper chutney powder for rice

Pirandai podi / Adamant creeper chutney powder for rice


Cuisine: Indian
Category: side dish
Serves: 1/2 cup
Prep time: 10 Minutes
Cook time: 20 Minutes
Total time: 30 Minutes


INGREDIENTS

  • Pirandai / Adamant creeper sticks - 10
  • Urad dal - 2 tbsp
  • Chana dal - 2 tbsp
  • Sesame seeds - 1 tsp
  • Red chilli - 3
  • Pepper - 1 tsp
  • Cumin seeds - 1 tsp
  • Tamarind - Gooseberry size
  • Cooking oil / Gingely oil / Sesame oil - 2 tbsp
  • Salt - as needed
HOW TO MAKE PIRANDAI PODI
  1. Grease your hands with sesame oil generously to avoid itching.
  2. Wash and peel the ridges of Pirandai. Chop into small pieces and set aside.
  3. Heat oil and saute pirandai pieces till it shrinks in size and color turns light green or whitish.
  4. Remove in a plate. In the same oil, saute urad dal, chana dal, red chilli, sesame seeds, pepper and cumin seeds in medium flame till dals turn golden in color.
  5. Lastly add tamarind, salt and sauteed pirandai sticks. Mix well and let it cool down. 
  6. Grind everything to a smooth powder. Transfer to an air tight box.
  7. Store and use for 2 weeks.
METHOD - STEP BY STEP PICTURES
  • Wash the Pirandai sticks and set aside. Grease hands with sesame oil / Gingely oil generously. Peel the ridges of Pirandai sticks and chop into 1 inch pieces.

  • Heat oil and saute Pirandai sticks till it shrinks in size and changes in color to light green. Remove in a plate.
  • pirandai podi recipe
  • In the same oil, saute urad dal, chana dal, sesame seeds, pepper corns, cumin seeds and red chilli in low to medium flame patienly till the color of dal changes to golden.

  • Lastly add tamarind, salt and sauteed Pirandai sticks. Mix well and let everything cool down. Grind to smooth powder and store in an air tight box. Serve with plain rice adding ghee. pirandai podi recipe

Note

  • Pirandai podi can be prepared with many variations.
  • You can skip tamarind if you wish but I recommend using it as it helps to reduce the itchiness of Pirandai while eating it.
  • You can use either chana dal or Urad dal for variations.


  Healthy, tasty Pirandai podi is ready to use with plain rice, idli, dosa!
pirandai podi recipe


Continue Reading...


December 11, 2021

Murungai keerai thogayal - Drumstick leaves Chutney Recipe

drumstick leaves thogayal

Murungai keerai thogayal is a super healthy and interesting thogayal recipe with drumstick leaves. Recently I started making drumstick leaves recipes regularly in my kitchen. Most of the time, I am making this soup recipe. Sometimes I try kootu, sambar, poriyal and this thogayal with it.

Among sambar, kootu, poriyal and thogayal, my choice is this thogayal. Then comes sambar. This drumstick leaves chutney / murungai keerai thogayal tastes so good even the kids in your house would love to have with plain rice adding ghee. Raksha who is a fussy eater when it comes to keerai recipes, loved this thogayal a lot.

Friends, do try this healthy and yummy murungai keerai thogayal / drumstick leaves chutney for rice and enjoy !. You can also try with idli, dosa if you like.

Murungai keerai thogayal / Drumstick leaves chutney for rice


Murungai keerai thogayal / Drumstick leaves chutney for rice

Murungai keerai thogayal / Drumstick leaves chutney for rice, idli, dosa


Cuisine: Tamil nadu
Category: Side dish
Serves: Serves 3
Prep time: 10 Minutes
Cook time: 20 Minutes
Total time: 30 Minutes


INGREDIENTS

  • Murungai keerai / Drumstick leaves - 1 cup
  • Big onion - 1
  • Tomato - 1
  • Tamarind - Small gooseberry size
  • Garlic cloves - 5
  • Red chilli - 3 to 4
  • Coconut - 2 tbsp
  • Turmeric powder - 1/4 tsp
  • Urad dal - 2 tsp
  • Chana dal - 2 tsp
  • Hing / Asafetida - a pinch
  • Salt & water - as needed
To temper
  • Sesame oil - 1 tbsp
  • Mustard seeds - 1/2 tsp
  • Red chilli - 1
HOW TO MAKE DRUMSTICK LEAVES CHUTNEY
  1. Wash the drumstick leaves. Set aside.
  2. Heat oil and roast urad dal, chana dal, red chilli, hing.
  3. Lastly add coconut, roast for a minute. Switch off. Remove in a plate.
  4. Add 1 tbsp oil again. Saute onion, tomato till tomato becomes mushy.
  5. Add drumstick leaves and saute for 5 to 10 minutes. Switch off the flame.
  6. Cool down and grind everything together to make a smooth paste.
  7. Heat oil in a kadai. Splutter mustard seeds. Add red chilli and the ground paste.
  8. Mix well and boil till thick. Remove and serve with plain rice adding ghee.
METHOD - STEP BY STEP PICTURES
  • Wash the drumstick leaves and set aside. Heat oil in a kadai. Saute chana dal, urad dal, red chilli and hing till dals turn golden in color. Lastly add coconut, mix well and switch off the flame.

  • Remove in a plate. Heat oil in the kadai. Saute onion, garlic and tomato till tomato becomes mushy. Add drumstick leaves and saute for 5 to 10 minutes till it becomes soft and shrinks in quantity. Switch off the flame.

  • At last grind everything together adding little tamarind to a smooth paste adding water and salt.

  • Heat oil in a kadai, splutter mustard seeds, red chilli. Add the ground paste and saute for few minutes till it becomes thick. Remove and serve with plain rice adding ghee.

Enjoy !

Note

  • Adjust the quantity of chilli as per your taste.
  • You can skip tomato and use tamarind alone. In that case, add BIG gooseberry sized tamarind.
  • To make it more healthy, you can add 1 tbsp of dry roasted sesame seeds too.


Healthy Drumstick leaves thogayal is ready to serve with plain rice.
Murungai keerai thogayal


Continue Reading...


December 1, 2021

Lotus Root Chips | Kamal Kakdi Chips | Lotus stem chips recipe

Lotus stem chips

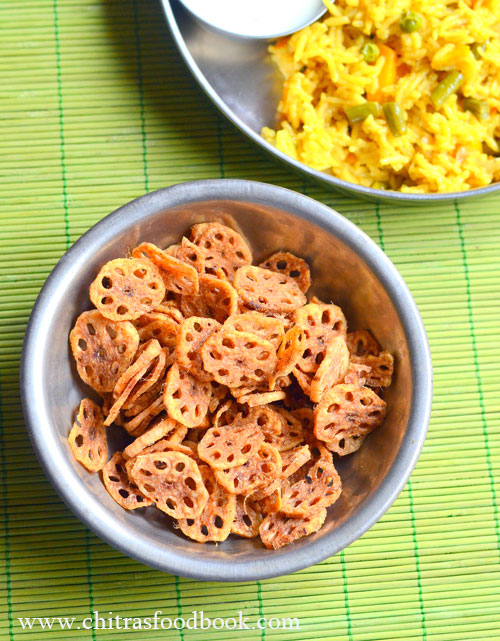
Lotus root chips is a super crispy and healthy snacks for adults and kids. Lotus stem also known as Lotus root is a nutritious vegetable. It is known as Kamal Kakdi / Kamal kakri in Hindi, Thamarai thandu / Thamarai kizhangu in Tamil, Nadru In Kashmiri, Renkon in Japanese, Thamara thant in Malayalam, Tavare dantu in Kannada, Tamara kada in Telugu. It is widely used in Indian and Japanese cuisine. It has a mild sweet and crunchy taste. However eating raw is not advisable as it is grown under the mud.

When I was pregnant, my doctor advised me to eat thamarai thandu vathal for my lunch as its rich in fiber, good for diabetes, controls stress and regulates blood pressure. It is also rich in Vitamins and minerals. So I used to get the dried lotus stem chips from Salem Home foods shop. My mom fries it along with papad and give me for lunch everyday. I love its taste. I never thought lotus root chips can be made at home with fresh lotus stem. Last week I bought some fresh Lotus stem online from FTH – Vegetable and grocery delivery app.

I tried this crispy and crunchy lotus stem chips yesterday for our weekend lunch along with vegetable biryani. It came out so well. Making lotus root chips at home is very easy. All you have to do is to wash and peel the skin. Slice thinly and deep fry. To make in Indian style, I added some red chilli powder and chat masala to the deep fried chips. It tastes so good with mild sweet taste ! We all loved it. In fact, this homemade lotus stem chips tastes much better than the ones I had during my pregnancy.

Friends, if you get fresh lotus stem in your place, do not forget to buy it and try this chips. Everyone will love it instantly. This chips also stays good for a week when stored in an air tight box. Ok, Lets see how to make Indian style lotus stem chips recipe/ Thamarai thandu chips with step by step pictures.

Lotus root chips

Lotus stem chips | Lotus root chips - Kamal Kakdi chips


Lotus stem chips | Lotus root chips - Kamal Kakdi chips

Lotus stem chips | Lotus root chips - Kurkuri Kamal Kakdi / crunchy chips recipe.


Cuisine: Indian
Category: Snacks
Serves: 2 cups
Prep time: 10 Minutes
Cook time: 20 Minutes
Total time: 30 Minutes


INGREDIENTS

  • Lotus stem / Lotus root - 2
  • Cooking oil - to deep fry
  • Red chilli powder - 1 tsp
  • Chat masala - 1/2 tsp
  • Salt - if required.
  • Water - to wash the lotus root
HOW TO MAKE LOTUS STEM CHIPS RECIPE
  1. Wash and peel the skin of lotus stem. Slice thinly.
  2. Wash again and spread in a cotton cloth. Let it dry.
  3. Heat oil and deep fry in batches. Toss and cook both sides.
  4. Remove when golden in color. Drain in a tissue paper.
  5. Take a bowl. Add the lotus stem chips. Sprinkle chilli powder and chat masala powder, salt if required.
  6. Mix well and serve. Store in a tight box and enjoy up to a week. Stays crispy !
METHOD - STEP BY STEP PICTURES
  • Wash and peel the skin of lotus stem. Slice thinly.
  • lotus stem chips recipe
  • Wash again and spread the sliced lotus stem in a cotton cloth. Let it dry for 10 minutes.
  • lotus stem chips recipe
  • Heat oil in a kadai to deep fry. Add the sliced lotus stem in batches. Toss and fry both the sides till it turns golden brown in color. Remove in a tissue paper and sprinkle chilli powder, chat masala powder and salt ( if necessary). Mix well and serve with hot coffee or tea ! Store in an air tight box and enjoy upto a week.
    Enjoy !
  • lotus stem chips recipelotus stem chips recipe

Note

  • You can skip chat masala and use chilli powder alone.
  • You can bake the chips in oven or air fryer instead of frying in oil. Bake at 180c for 10 to 15 minutes till it turns crispy.


  Easy, healthy, Lotus stem chips is ready to munch. Enjoy with rice, tea or coffee!
lotus stem chips recipe

Continue Reading...


November 26, 2021

20 Chutney recipes without tomato | Chutney Without Tomato

chutney without coconut

I never thought of making this collection of chutney recipes without tomato until its price hiked like sky rocket. Every year before Diwali, my in-laws tells me to keep onion and tomato in stock as its price goes to peak after Diwali because of rainy season. So I buy 2-3 kgs and keep in hand. This year too, I had a stock of both in my pantry. So the price hike of tomato din’t affect me much. But some of my friends were asking me to suggest few chutney and sambar recipes without tomato as a side dish for idli, dosa and chapathi. So I thought of making this list of chutney recipe without tomato.

Most of the chutney recipes here uses onion, garlic, peanut and coconut as major ingredients. Some of the chutney recipes like curry leaves chutney, carrot chutney and brinjal chutney are without coconut too. if you are looking for how to make chutney without tomato and coconut, you have some recipes in this list. I hope this collection of chutney recipes without tomato will be useful to many at this time. Friends, do check out this chutney recipes without tomato for idli, dosa and chapathi. You will love them. Do share your feedback if you try any. I will be happy to hear that.

Onion chutney without tomato and coconut

Pottukadalai chutney without tomato

Onion Garlic chutney without tomato, coconut

Peanut chutney without tomato


Carrot chutney


Garlic chutney without tomato, coconut

Small onion chutney

Radish Chutney


Walnut chutney


Andhra hotel style peanut chutney

Hotel style thick coconut chutney / Getti chutney

Easy peanut chutney without tomato

Curry leaves chutney

Peanut chutney without onion, garlic, tomato, coconut

Brinjal chutney

Onion chutney without tomato, coconut for appam

Raw onion chutney

Onion Green chilli chutney

Raw onion chutney – version 2

Green chilli chutney

Beetroot chutney


Continue Reading...